Managing dependencies
A popular way of packaging code and dependencies for remote and production-ready execution is to use (Docker) container images.
As described in structuring
projects, in most cases you don't have to worry
about packaging your own code as images manually, as Metaflow takes care of it automatically.
You need to specify any 3rd party dependencies, such
as frameworks you would normally install with pip, conda, uv, etc., through
one of the mechanism described in this article.
If in doubt, typically the easiest approach is to
use @pypi and @conda. You
can come back to this page later if @pypi/@conda can't get the job done easily.
You only need to include external dependencies required by the @step functions in your Metaflow code.
You do not need to include Metaflow or the Outerbounds package itself in the dependencies specified for each @step function.
Managing dependencies with container images
Under the hood, all cloud runs and workstations on Outerbounds are containerized. Outerbounds supports three approaches for choosing and customizing the images used, summarized as columns in this table:
@conda/@pypi | 3rd party image | Custom image | |
|---|---|---|---|
| Starts quickly | 🤷 | 👍 | 👍 |
| Easy to maintain | 👍 | 👍 | 👎 |
| Flexible | 👍 | 👎 | 🤷 |
| Dev/Prod consistency | 👍 | 🤷 | 🤷 |
| Enforceable | 👎 | 👍 | 👍 |
Here, 👍 indicates that the requirement is well-supported, 🤷 indicates that extra effort may be needed to make the approach work well, and 👎 indicates that the requirement is not satisfied by the approach. Let's go through the columns one by one:
1. Customize an image on the fly with @conda and @pypi
When using @pypi and @conda with the --environment=fast-bakery option (see an example below),
Outerbounds bakes and manages a custom image, including your defined
dependencies, on the fly. No need to write Dockerfiles by hand.
In contrast to open-source Metaflow, Outerbounds converts dependencies installed via
Metaflow's native @conda and @pypi integrations to container images automatically,
drastically speeding up execution of tasks using these decorators.
Consider the benefits of this approach:
Users can easily define and change the libraries they need without anyone having to write
Dockerfiles and bake images manually.It is easy to maintain any number of project-specific images without having to coordinate iamge upgrades across projects and teams.
Since
@condaand@pypialso work locally without Docker, users can develop code in consistent environments on their local workstations without having to pay the overhead of Docker-based execution. As a result, it is possible to keep development and production environments consistent even in the presence of many project-specific dependencies.
And the downsides:
Initially, it may take a few minutes to create a virtual environment for local development. Environments are cached, so subsequent runs will start instantly.
If your organization requires that all executions must use a common blessed image (through Perimeter Policies), this approach is not suitable as it allows users to customize the image on the fly.
2. Use an off-the-shelf, 3rd party image
If your project has tightly scoped needs, e.g. it just uses pytorch or transformer packages, you may be able to rely on a 3rd party image, such as the official PyTorch image or HuggingFace's transformer image.
Consider the pros of this approach:
It is quick to get started if you know the image you want to use. And, you are not on the hook for maintaining the image.
The 3rd party image may contain arbitrary optimizations and other features that would be hard to express via
@pypiand@conda.You can enforce that all projects use the image through Perimeter Policies.
And the downsides:
Lack of flexibility: If you need libraries (or versions thereof) that are not provided by a 3rd party image, you are out of luck.
It may be hard to maintain a consistent execution environment if the image provider is not diligent about image versioning and maintenance.
Security concerns may be an issue, as you are executing a large chunk of unaudited code in your environment. You need to trust the image provider.
Unless you use workstations with the same image, maintaining consistency between development and production can be hard, as development may not take place in the same environment as cloud executions.
3. Use a custom, private image
Your organization might already have a container image that includes the necessary dependencies. In this case, it’s often simplest to continue using the existing image. This approach retains all the benefits of a third-party image, with the added advantage of customization. However, it also means your organization is responsible for maintaining the image, which requires additional effort.
The primary drawback is the maintenance overhead and inflexibility in supporting project-specific dependencies. Maintaining a separate image for each project manually can often be too cumbersome and time-consuming.
Example: PyTorch on GPUs
Let's demonstrate the first two approaches in practice with TorchTestFile that
was introduced in defining environments. It resembles
a realistic project that uses pytorch, optionally running on GPUs that require CUDA drivers.
Save the flow in torchtest.py:
from metaflow import FlowSpec, step, current, Flow, resources, conda_base, card
from metaflow.cards import Markdown
from metaflow.profilers import gpu_profile
import time


# ⬇️ Enable this to test @conda with GPU or on workstations
#@conda_base(
#   python="3.11.0",
#   packages={"pytorch::pytorch-cuda": "12.4", "pytorch::pytorch": "2.4.0"},
#)

# ⬇️ Alternatively, enable this to test @conda on Mac OS X (no CUDA)
# @conda_base(python='3.11.0', packages={'pytorch::pytorch': '2.4.0'})

class TorchTestFlow(FlowSpec):

    # ⬇️ Enable these two lines to test GPU execution
    # @gpu_profile()
    # @resources(gpu=1, memory=8000)

    @card(type="blank", refresh_interval=1, id="status")
    @step
    def start(self):
        t = self.create_tensor()
        self.run_squarings(t)
        self.next(self.end)

    def create_tensor(self, dim=5000):
        import torch  # pylint: disable=import-error

        print("Creating a random tensor")
        self.tensor = t = torch.rand((dim, dim))
        print("Tensor created! Shape", self.tensor.shape)
        print("Tensor is stored on", self.tensor.device)
        if torch.cuda.is_available():
            print("CUDA available! Moving tensor to GPU memory")
            t = self.tensor.to("cuda")
            print("Tensor is now stored on", t.device)
        else:
            print("CUDA not available")
        return t

    def run_squarings(self, tensor, seconds=60):
        import torch  # pylint: disable=import-error

        print("Starting benchmark")
        counter = Markdown("# Starting to square...")
        current.card["status"].append(counter)
        current.card["status"].refresh()

        count = 0
        s = time.time()
        while time.time() - s < seconds:
            for i in range(25):
                # square the tensor!
                torch.matmul(tensor, tensor)
            count += 25
            counter.update(f"# {count} squarings completed ")
            current.card["status"].refresh()
        elapsed = time.time() - s

        msg = f"⚡ {count/elapsed} squarings per second ⚡"
        current.card["status"].append(Markdown(f"# {msg}"))
        print(msg)

    @step
    def end(self):
        # show that we persisted the tensor artifact
        print("Tensor shape is still", self.tensor.shape)


if __name__ == "__main__":
    TorchTestFlow()
Let's run this flow using the approaches listed above:
Using an off-the-shelf image
Since PyTorch is a popular package, we can just use an off-the-shelf Docker image, for instance, one of the prepackaged AI images by AWS.
We could specify a Docker image as an argument to
the @kubernetes decorator
in the code, but for ad-hoc executions, we can do it on the command line too:
python torchtest.py run --with kubernetes:image=763104351884.dkr.ecr.us-east-1.amazonaws.com/pytorch-training:2.3.0-gpu-py311-cu121-ubuntu20.04-ec2
Note that image is quite large, 5-10GB, so it may take a few minutes to start the task for the first time. Subsequent executions should be faster as the image will be cached.
Run on a GPU
If you have GPU instances available in your cluster, you can test the flow
on GPUs! To see if GPUs are available, go to Status,
click Pools and look for a note Has Access to GPUs.
Uncomment these lines
@gpu_profile()
@resources(gpu=1, memory=8000)
to request a GPU for the task, and to attach a GPU profiling card in the task for extra GPU-related information. You can then use the same command line as above to run the flow:
python torchtest.py run --with kubernetes:image=763104351884.dkr.ecr.us-east-1.amazonaws.com/pytorch-training:2.3.0-gpu-py311-cu121-ubuntu20.04-ec2
Develop on a workstation using a custom image
You can set up a workstation using the above container image:
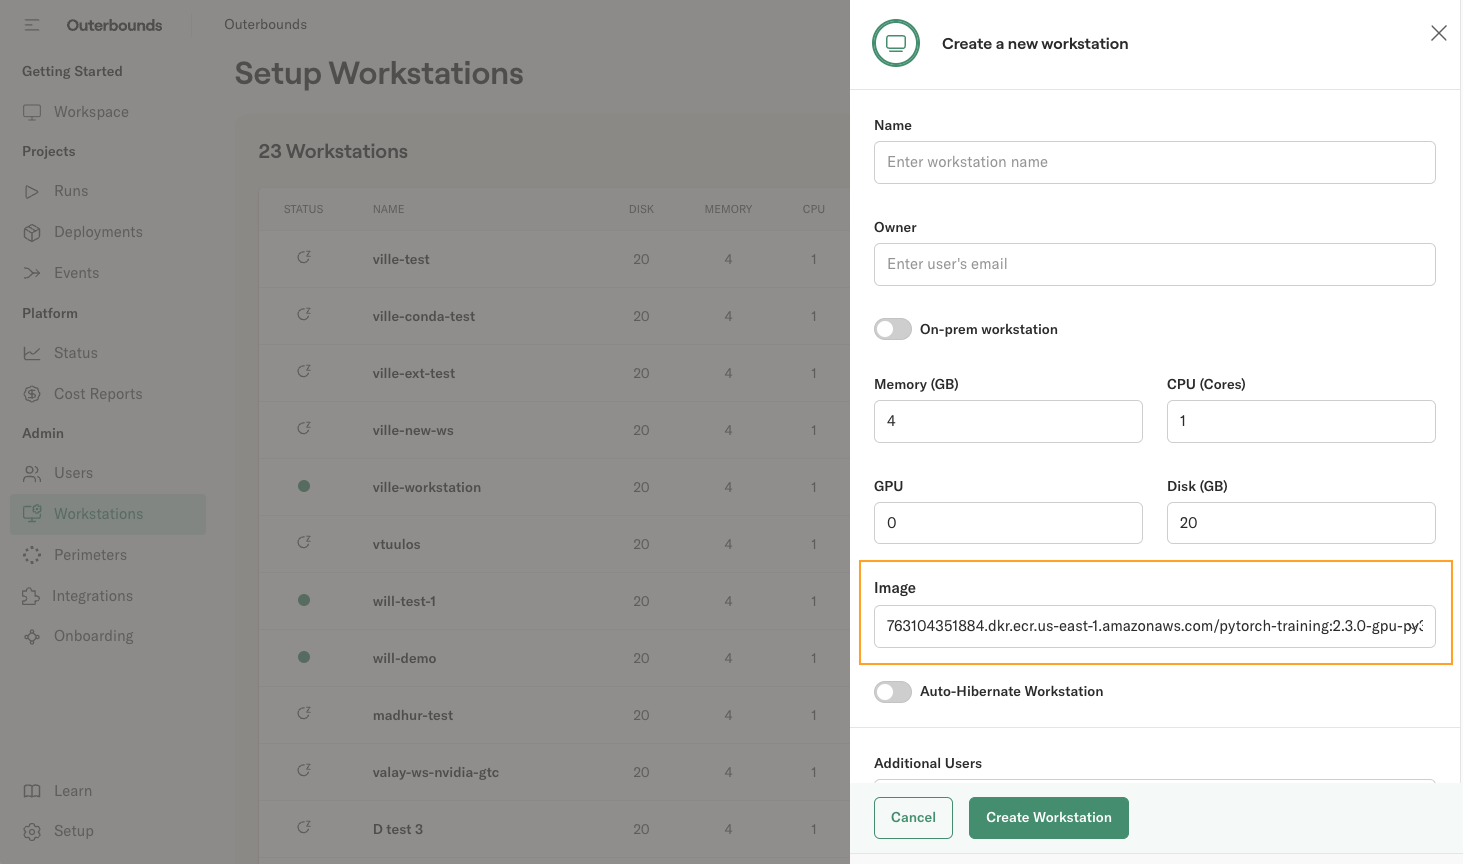
Copy the image URL in the Image field:
763104351884.dkr.ecr.us-east-1.amazonaws.com/pytorch-training:2.3.0-gpu-py311-cu121-ubuntu20.04-ec2
You can use any publicly available image to launch a workstation. You can also use images from your private image repository (e.g. ECR on AWS) if the repository resides in the same cloud account as the Outerbounds deployment. Contact your support Slack for cross-account registry access.
Now on this workstation, you can run the code without anything special as the dependencies are included in the underlying image already:
python torchtest.py run
Notably, when you execute
python torchtest.py run --with kubernetes
on this workstation, you don't need to specify image on the command line, as Outerbounds uses the
workstation image for cloud executions by default to maintain consistency between development
and cloud executions.
When you run --with kubernetes on a workstation, the workstation image is used for cloud executions
automatically to maintain consistency: If the code works on the workstation, it will work in the cloud
as well.
Using @conda / @pypi
Compared to the off-the-shelf image approach shown above, the @conda/@pypi gives you more flexibility
with minimal maintenance overhead. You can require any libraries on the fly, making sure that each project
can use and maintain their specific execution environment without having to coordinate requirements (and
their upgrade schedule) with other projects. Hence, this approach is useful when working on one or more
projects with bespoke requirements.
Uncomment these lines to enable @conda-based dependencies:
@conda_base(
   python="3.11.0",
   packages={"pytorch::pytorch-cuda": "12.4", "pytorch::pytorch": "2.4.0"},
)
These lines will create an image layer with pytorch and CUDA drivers installed on the fly.
Execute the flow:
python torchtest.py --environment=fast-bakery run --with kubernetes
You can run the flow with or without GPUs. Note that in contrast to 3rd party images. you have full control over frameworks and versions used.
Develop on a workstation using @pypi/@conda
You can develop this flow on a workstation by running
python torchtest.py --environment=conda run
The command may take a few minutes to execute for the first time as the dependencies are being installed locally. Subsequent runs will start faster, as the environment is cached.
In contrast to the image-based approach shown above, the @conda/@pypi-approach allows you to work with
multiple environments on a workstation while maintaining consistency between development and production.
Develop on a laptop using @pypi/@conda
If you want to run the example on Macbook, use this @conda_base line:
@conda_base(python='3.11.0', packages={'pytorch::pytorch': '2.4.0'})
which drops the CUDA drivers that are not available on OS X. This highlights a benefit of using Linux-based cloud workstations for development: It is easier to maintain a fully consistent environment when development happens on the same architecture (Linux) as cloud-based execution.
A benefit of @conda and @pypi is that the developer doesn't have to deal with
Docker locally which can add extra overhead and complexity during development.