Programmatic access via machine users
All access in Outerbounds is centrally authenticated and authorized. For human users, the authentication is linked to your SSO system. What if you want to access Outerbounds from another external system, e.g. a CI/CD workflow, which doesn't correspond to a human user?
Outerbounds allows you to create machine users for programmatic use cases like this. Similar to authenticated human users, using machine users is centrally managed and secure. Outerbounds Platform relies on Github, CircleCI or AWS IAM for authentication of machine users just like it relies on Google, Okta and other IdPs for humans.
Identity by GitHub Actions
Outerbounds supports GitHub Actions to authenticate as Machine users using OIDC tokens (JWT) issued by GitHub. These tokens can be requested by a GitHub Actions job and then used to authenticate to Outerbounds to run, deploy and trigger flows.
To securely authenticate GitHub Actions jobs, users must specify the GitHub organization, and repository names of their jobs when creating the Machine user. Users can also optionally specify the branch, workflow and/or environment names. These attributes are part of the claims in the OIDC tokens provided by GitHub. Outerbounds will validate these attributes when GitHub actions jobs attempt to authenticate.
To get started, in the Ourterbounds UI, navigate to Users page -> Machines tab and click on "Create New". Once you have created the machine user, you can click on the user to get a generated sample GitHub Actions workflow that shows how to authenticate as the specific machine user and trigger flows.

Identity by CircleCI
Outerbounds also supports CircleCI jobs to authenticate as Machine users using OIDC tokens (JWT) issued by CircleCI. These tokens are automatically assigned by CircleCI as environment variables to CircleCI jobs, namely $CIRCLE_OIDC_TOKEN and $CIRCLE_OIDC_TOKEN_V2. Either of these tokens can be used to authenticate to Outerbounds to run, deploy and trigger flows.
To securely authenticate CircleCI jobs, users must specify the CircleCI organization id, project id, and source control repository URL of their jobs when creating the Machine user. Users can also optionally specify the branch name. These attributes are part of the claims in the OIDC tokens provided by CircleCI. Outerbounds will validate these attributes when CircleCI jobs attempt to authenticate.
To get started, in the Ourterbounds UI, navigate to the Users page -> Machines tab and click on "Create New". Once you have created the machine user, you can click on the user to get a generated sample Circle workflow that shows how to authenticate as the specific machine user and trigger flows.

Identity by GitLab CI/CD
Outerbounds supports GitLab CI/CD jobs to authenticate as Machine users using OIDC tokens (JWT) issued by GitLab via the id_tokens keyword. The token is exposed to your pipeline as a CI variable (e.g. $OUTERBOUNDS_ID_TOKEN) and used to authenticate to Outerbounds when running obproject-deploy.
To securely authenticate GitLab CI jobs, users must specify the GitLab project URL (or numeric project ID) and the source control namespace when creating the Machine user. Users can optionally specify the branch (ref). These attributes are part of the claims in the OIDC tokens provided by GitLab. Outerbounds will validate these attributes when GitLab CI jobs attempt to authenticate.
To get started, in the Outerbounds UI, navigate to Users page → Machines tab and click on "Create New" and select GitLab as the type. The form lists the exact claim fields to fill in.
aud is not auto-setGitLab evaluates id_tokens at pipeline-creation time, before any scripts run. The aud: value in your .gitlab-ci.yml must be set to your Outerbounds platform URL (e.g., https://my-company.outerbounds.com) and cannot be templated from obproject.toml. See the GitLab section of CI/CD integration for the YAML pattern.
Identity by Azure DevOps
Outerbounds supports Azure DevOps Pipelines to authenticate as Machine users via Azure AD workload identity federation. The token ($idToken) is obtained by the AzureCLI@2 task when addSpnToEnvironment: true is set against a configured Azure service connection, then passed to outerbounds service-principal-configure --jwt-token.
The auth chain involves two distinct objects you need to set up together:
- An Azure DevOps service connection in your Azure DevOps project, federated to an Azure AD app registration. This is set up in Azure DevOps Project Settings → Service Connections.
- An Outerbounds machine user of type Azure DevOps. In the OBP UI, navigate to Users page → Machines tab → "Create New" and select Azure DevOps. The form lists the claim fields the OIDC token will carry (Azure AD tenant ID, app/client ID, and typically the Azure DevOps organization URL and project name).
Outerbounds validates the Azure AD claims when the pipeline attempts to authenticate; the service connection on the Azure DevOps side is what makes those claims available to the pipeline in the first place.
See the Azure DevOps section of CI/CD integration for the corresponding YAML pattern.
Identity by IAM
Outerbounds also supports authenticating machine users backed by AWS IAM. Systems that need to authenticate as machine users of type IAM need to be able to assume the IAM roles associated with the machine users, to prove their identity. There are many established ways to provide AWS credentials in CI/CD systems, microservices, and other environments securely, which allows Outerbounds to rely on the same secure mechanism to authenticate machine users.
Most of the work related to setting up IAM backed machine users is about configuring the corresponding IAM roles. Luckily, once you have done this once, creating and using machine users becomes much easier.
1. Preparing an AWS IAM role to be used with machine users
You need to perform these two steps to enable your AWS account to be used with machine users. This is a one-time operation per AWS account. You can either create a new IAM role from scratch (option A below), or use an already existing IAM role (option B below).
Option A. Creating a new IAM role from scratch
Since machine users are backed by AWS IAM, you need an IAM role that can assume the identity of the machine users. If you already have an IAM role that you'd want to use (for example, the role that is used by your CICD system), skip to the next section (option B).
A.1 Select an AWS account and create a new role
You need to select the AWS account that you want to use to create an IAM role to use with this machine users. The easiest solution is to use the same account where Outerbounds has been deployed.
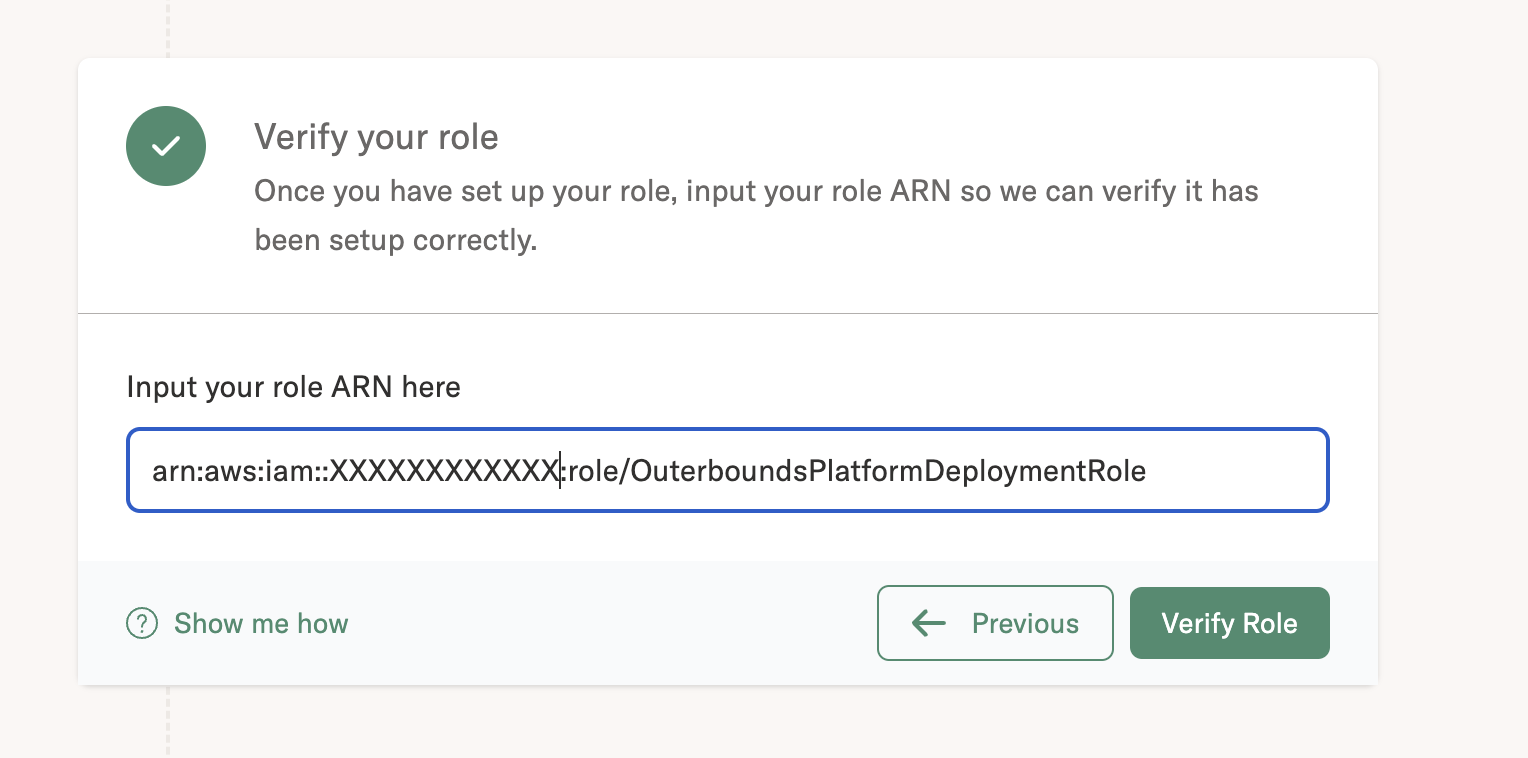
What AWS account is Outerbounds deployed in?
The easiest way to check is to go to Outerbounds UI as an admin, see the dashboard. You should see something like the screenshot below, and your AWS account Id will be present in place of the XXXXXXXXXXXX.
If you want to use a new role in a different AWS account than the AWS account where Outerbounds is deployed, communicate the AWS account Id to the Outerbounds team. This is a one time action only; for adding any other machine users under this account, you don’t need to inform us. Please give us 24 hours to register your account id on our end.
A.2 Set up a permission policy for the new role
You have to set up an IAM policy that allows an IAM role to be used in conjunction with machine users. You'll need an Outerbounds Control Plane AWS account Id provided to you by the Outerbounds team. Note that it is not the same as your AWS account in the previous section.
- In your AWS Console, Go to
IAM -> Policies -> Create Policies
- This should open up a page called “Policy Editor”. On the right side, you will see a “JSON” button that allows specifying the policy in Json. Click on it.
- Under
“Statement”: []add:
{
    "Effect": "Allow",
    "Action": "secretsmanager:GetSecretValue",
    "Resource": "arn:aws:secretsmanager:MY-REGION:CONTROL-PLANE-ACCOUNT:secret:*"
},
{
    "Effect": "Allow",
    "Action": "kms:Decrypt",
    "Resource": "arn:aws:kms:MY-REGION:CONTROL-PLANE-ACCOUNT:key/*"
}
Replace MY-REGION with the AWS region where Outerbounds is deployed and CONTROL-PLANE-ACCOUNT with the AWS account Id provided to you by the Outerbounds team.
- Provide a policy name, example:
outerbounds-service-principals. - Click on Create Policy.
We can now attach this IAM policy to IAM roles we want to use with machine users.
A.2 Attach policy to your new role
- Go to your Role.
- Click on
Add permissions -> Attach Policy. - Search for
outerbounds-service-principals(or your policy name from the previous step) and select it. - Click on Add permissions.
- Your IAM role is now ready to use.
We're all set on AWS side. Please go to step 2 below to create a machine user in Outerbounds.
Option B. Using an existing AWS IAM role
If you have an existing AWS IAM role that can be assumed in environments where you want to access Outerbounds, follow the steps below.
Note that if you want to use an existing role that is in a different AWS account than the account where Outerbounds is deployed, please communicate the AWS account Id to the Outerbounds team. This is a one time action only; for adding any other machine users to any role in the same AWS account, you don’t need to notify us. Please give us 24 hours to register your AWS account Id on our end.
B.1 Set up a permission policy for the role
You have to set up an IAM policy that allows an IAM role to be used in conjunction with machine users. You'll need an Outerbounds Control Plane AWS account Id provided to you by the Outerbounds team.
- In your AWS Console, Go to
IAM -> Policies -> Create Policies
- This should open up a page called “Policy Editor”. On the right side, you will see a “JSON” button that allows specifying the policy in Json. Click on it.
- Under
“Statement”: []add:
{
    "Effect": "Allow",
    "Action": "secretsmanager:GetSecretValue",
    "Resource": "arn:aws:secretsmanager:MY-REGION:CONTROL-PLANE-ACCOUNT:secret:*"
},
{
    "Effect": "Allow",
    "Action": "kms:Decrypt",
    "Resource": "arn:aws:kms:MY-REGION:CONTROL-PLANE-ACCOUNT:key/*"
}
replace MY-REGION with the AWS region where Outerbounds is deployed and CONTROL-PLANE-ACCOUNT with the AWS account Id provided to you by the Outerbounds team.
- Provide a policy name, example:
outerbounds-service-principals. - Click on Create Policy.
We can now attach this policy to roles we want to use with machine users.
B.2 Attach policy to your existing role
- Go to your Role.
- Click on
Add permissions -> Attach Policy. - Search for
outerbounds-service-principals(or your policy name from the previous step) and select it. - Click on Add permissions.
- Your IAM role is now ready to use.
2. Create a new machine user
In the Outerbounds UI, navigate to Users page --> Machines tab and click on Create New.
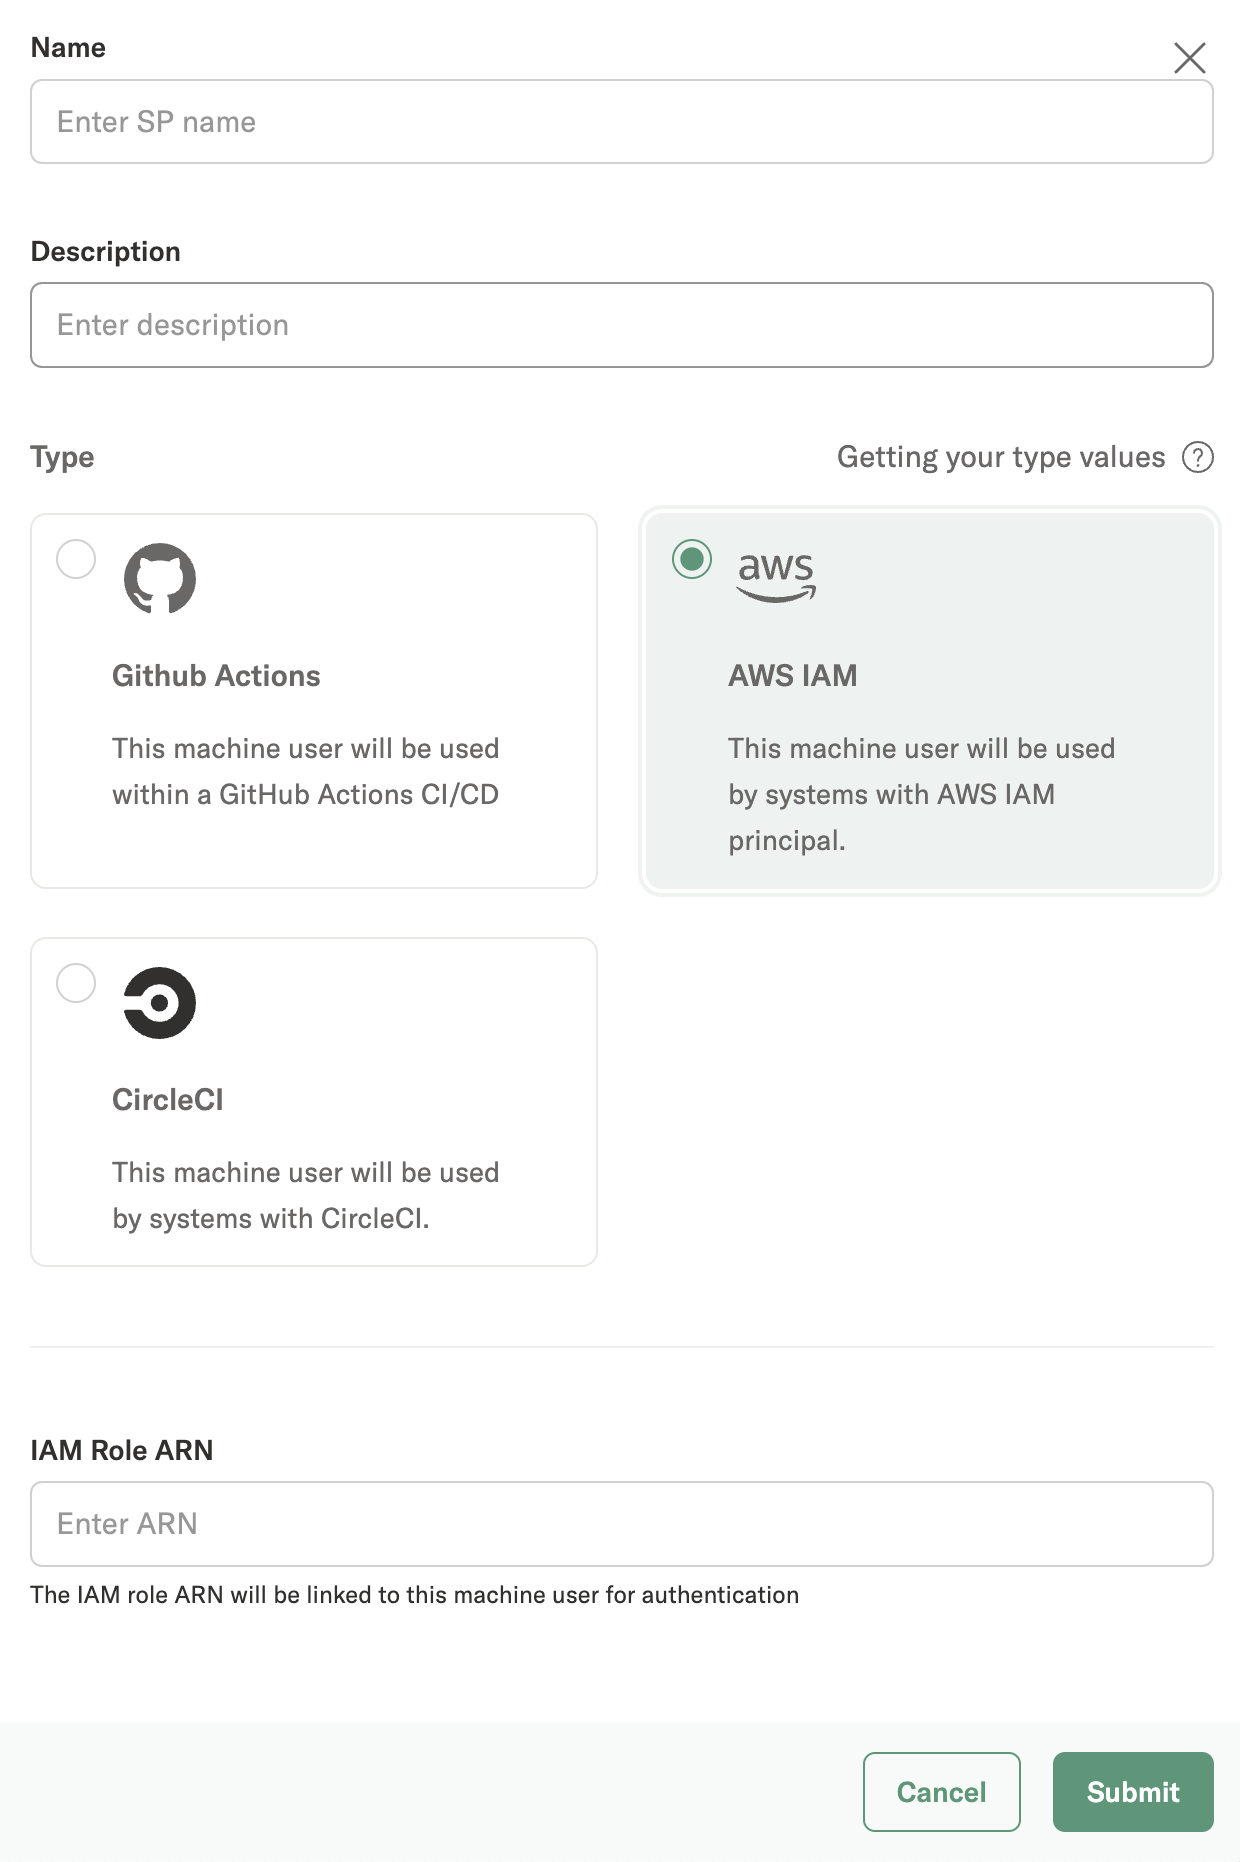
Once you have completed filling out the form click on Submit. A new machine user of type IAM should appear on the list.
3. Using a machine user
Choose a token on the list that you want to use. Click the down arrow and choose "Use". You should see a view like this:
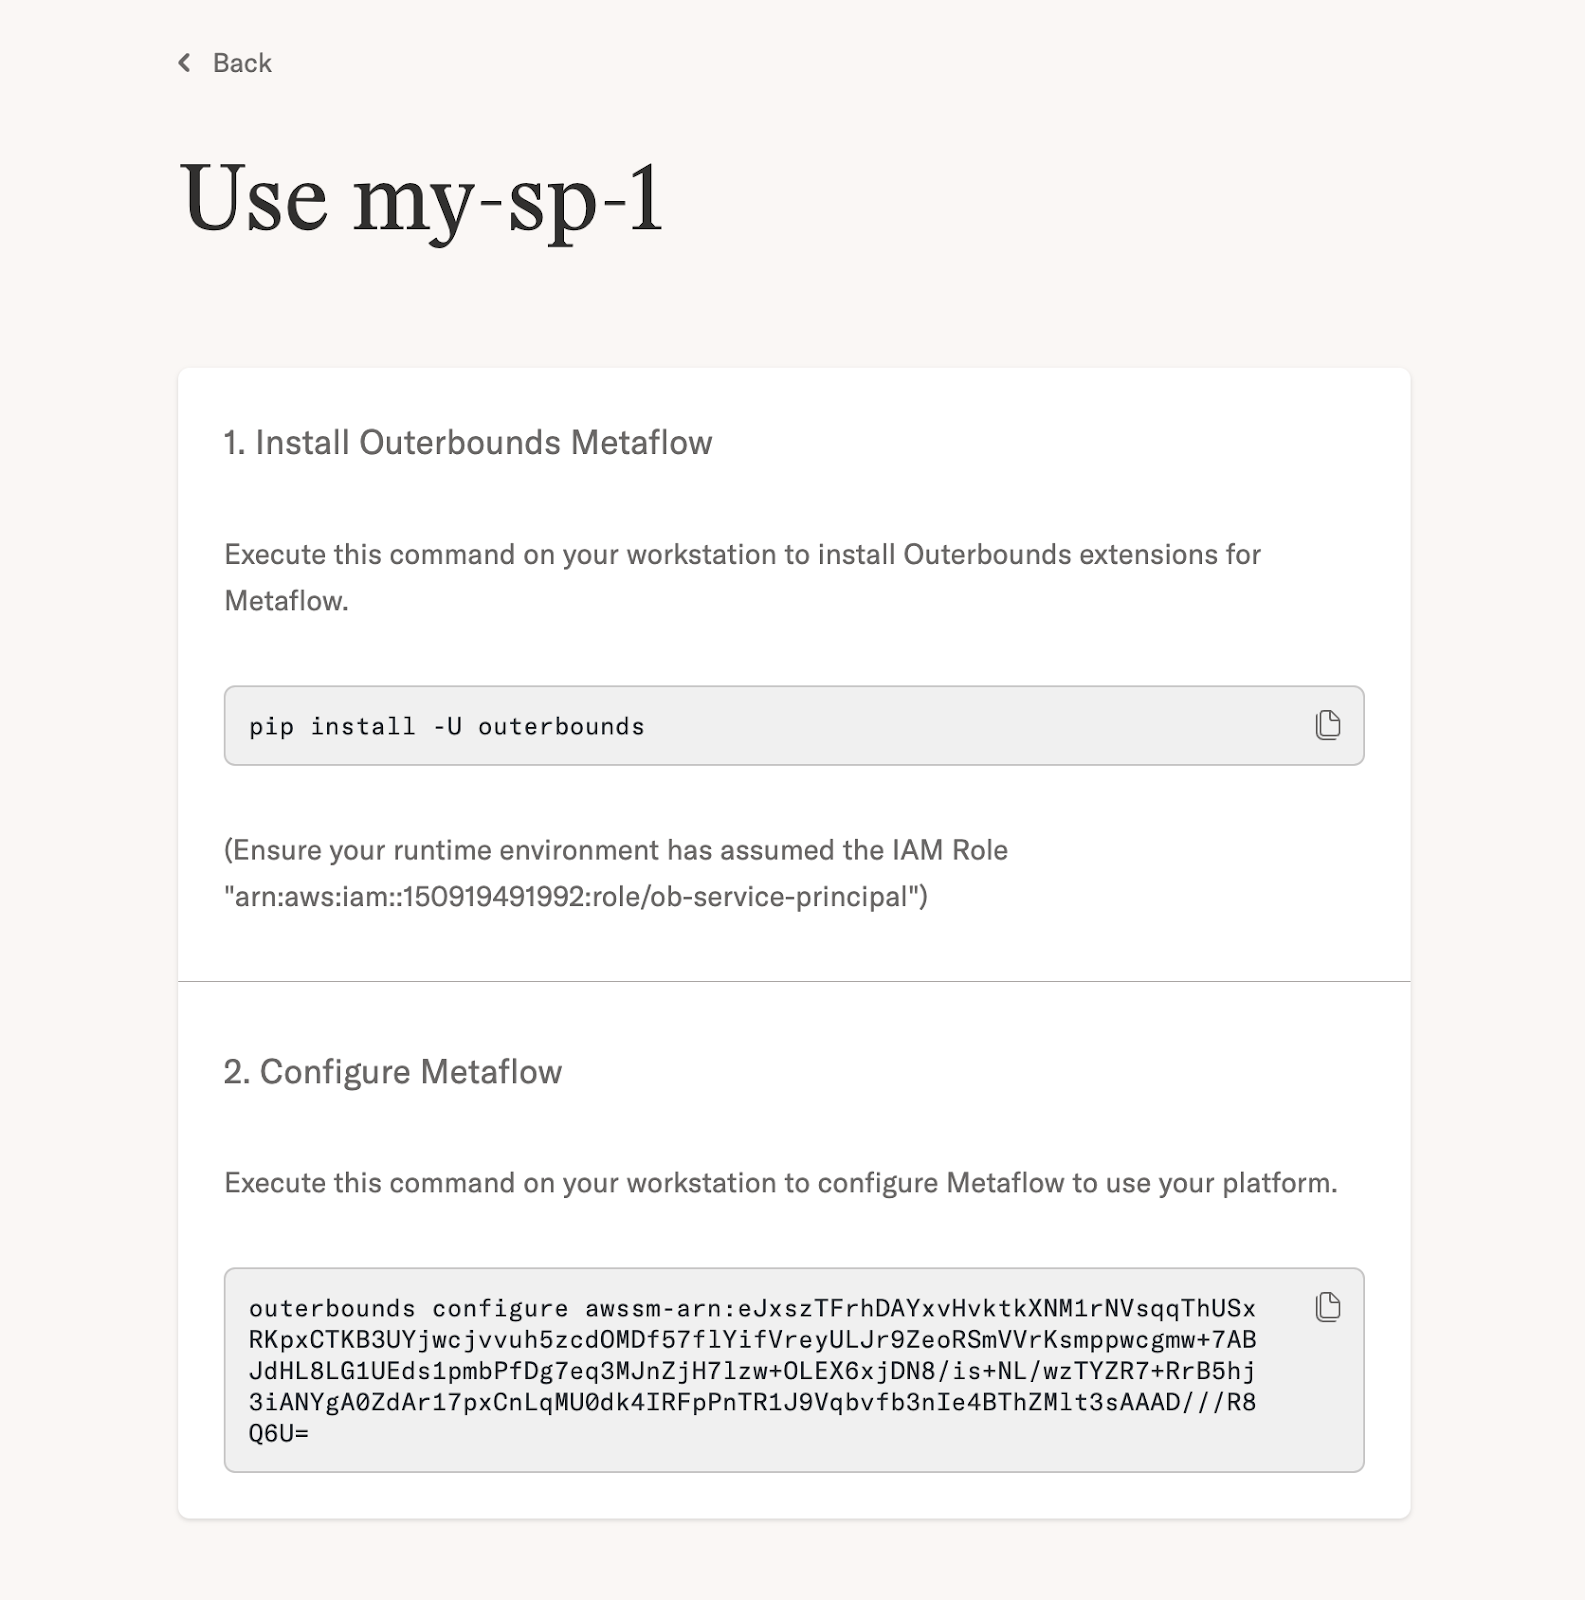
You need to follow these three steps in any CI/CD step or in any other environment where you want to use the token:
- Make sure that the environment can assume the assigned IAM role.
- Install the
outerboundspackage. - Configure the auth token by copy-pasting the CLI command in the text box.
After these steps, you can run Metaflow flows, access artifacts, and deploy workflows programmatically!