Sagemaker on Outerbounds
Introduction
Welcome to the Sagemaker on Outerbounds journey!
📈 Learning objectives
The goal of this self-contained lesson is to configure your Outerbounds account to work with AWS Sagemaker. You will:
- set up an IAM role that allows Outerbounds to interact with Sagemaker, and
- launch training jobs and deploy model endpoints from Outerbounds workstations and Metaflow tasks.
Create Sagemaker resources
To complete this section, open both the Integrations view and the AWS console for the account you'd like to interact with Sagemaker.
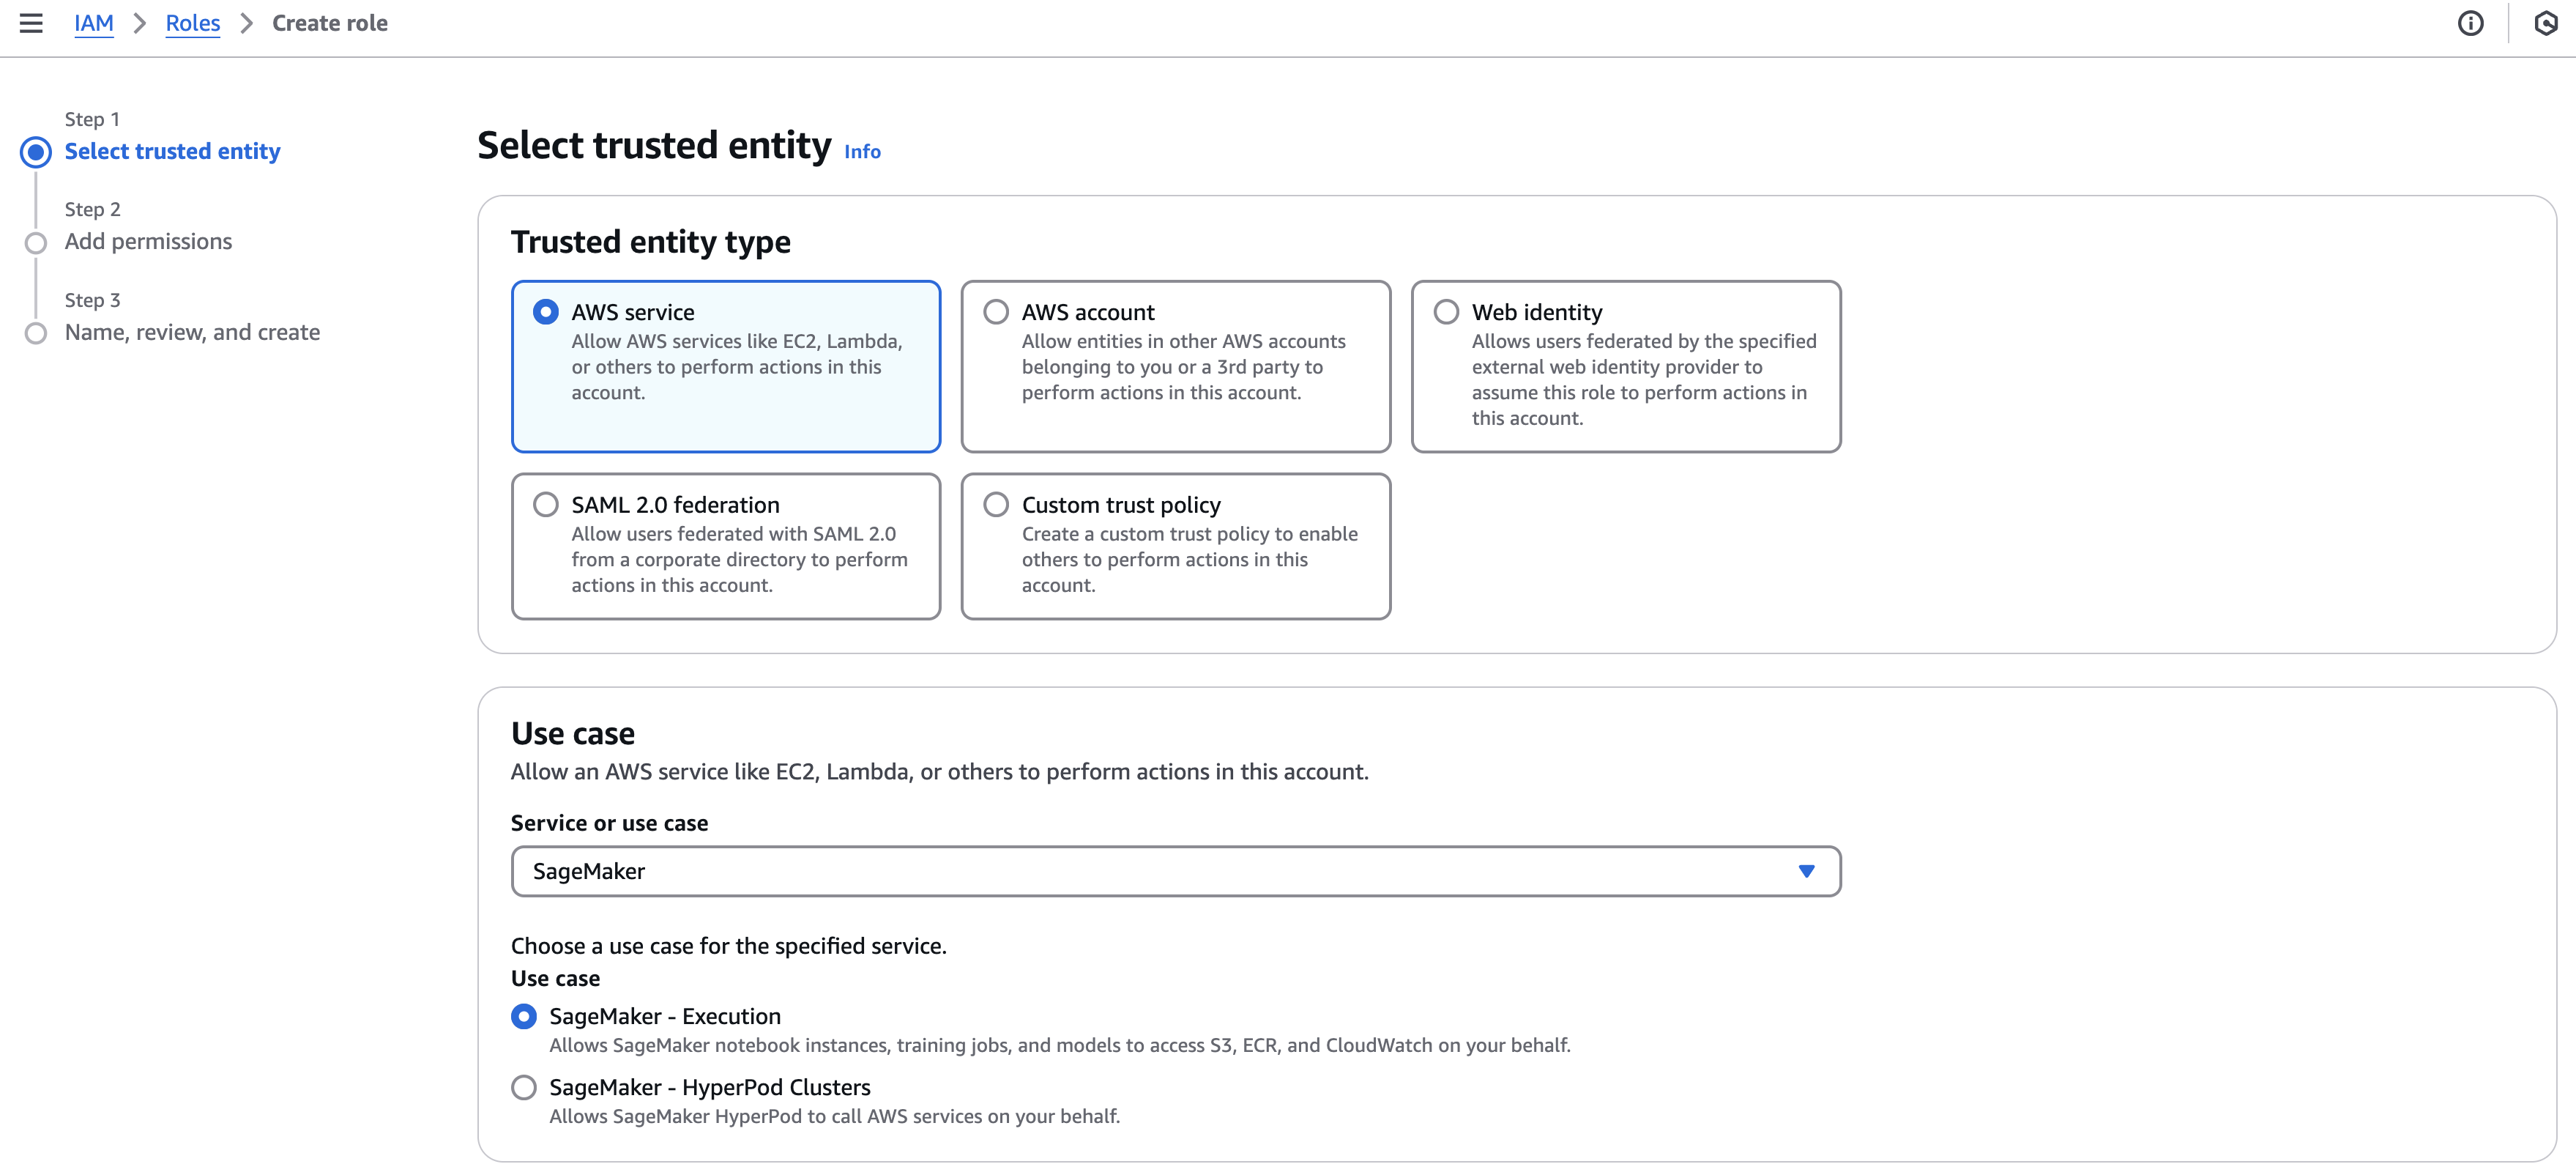
Set up a Sagemaker execution role
First, create your AWS IAM role in the same way you normally would, for example by going to the AWS console and navigating to the IAM pages.
You can create a role with sufficient permissions by selecting the Sagemaker - Execution use case.
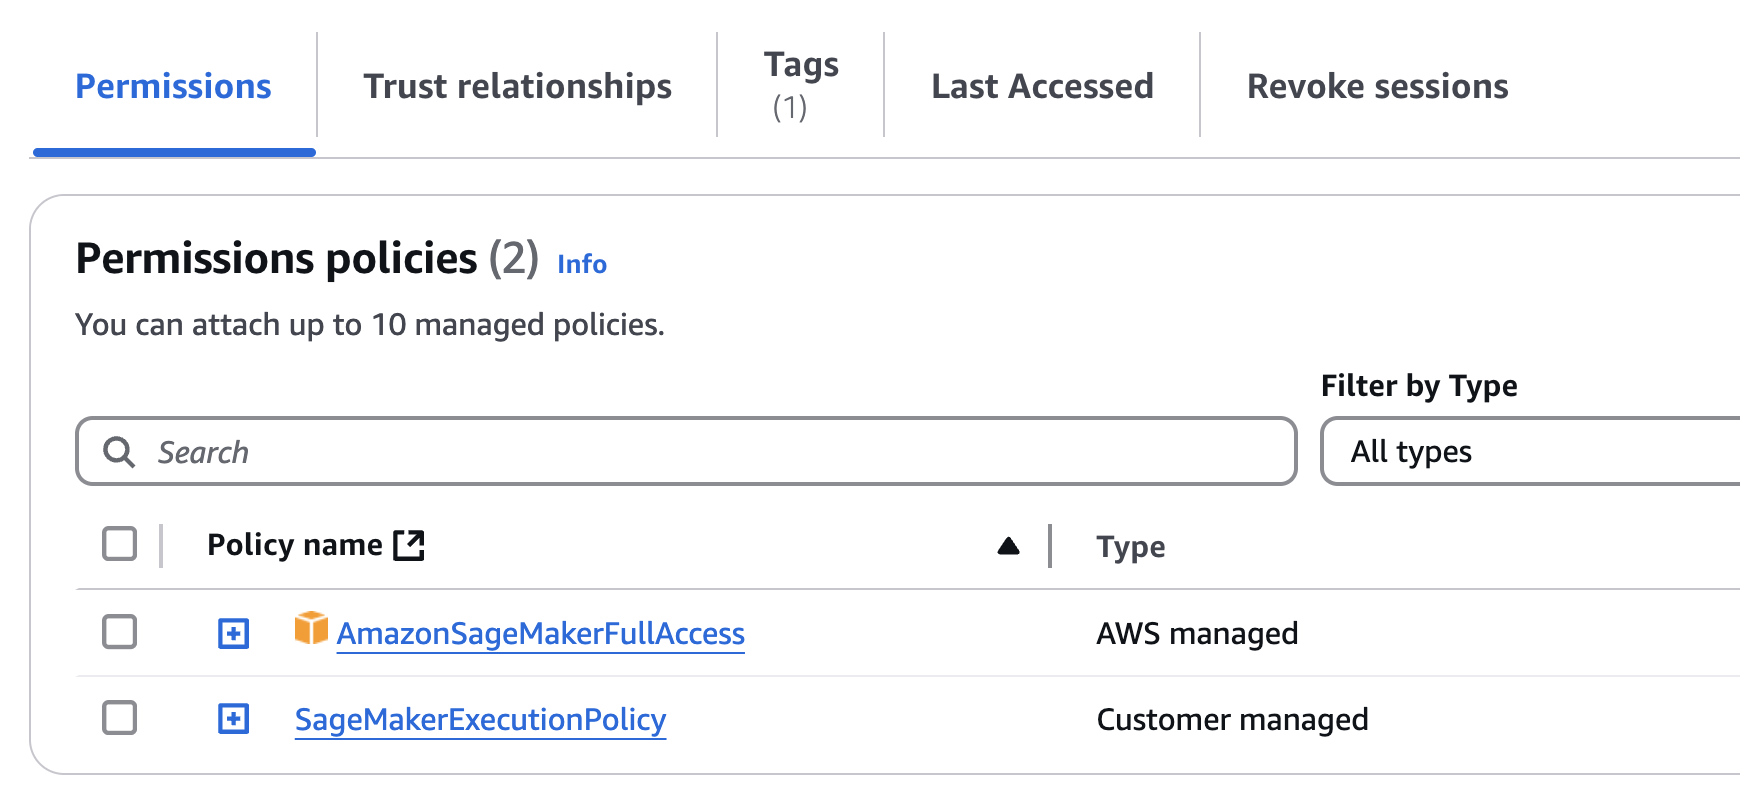
There are three important properties this role requires. This section walks through the details. First, the appropriate Sagemaker permissions policies. Second, the trust relationship with your Outerbounds deployment AWS account. Third, a tag related to your Outerbounds deployment.
- Permissions policies: The role needs to have the
AmazonSageMakerFullAccesspolicy, or your organization's modified Sagemaker execution role, attached. This policy allows the role to perform actions on Sagemaker resources.
- Trust relationship: The role requires a trust relationship with the Outerbounds task role as the principal. The trust relationship should look like this:
{
    "Version": "2012-10-17",
    "Statement": [
        {
            "Effect": "Allow",
            "Principal": {
                "Service": "sagemaker.amazonaws.com"
            },
            "Action": [
                "sts:AssumeRole",
                "sts:SetSourceIdentity"
            ]
        },
        {
            "Effect": "Allow",
            "Principal": {
                "AWS": "arn:aws:iam::<AWS_ACCOUNT_ID_OUTERBOUNDS_DATAPLANE>:role/obp-<UNIQUE_CODE>-task"
            },
            "Action": [
                "sts:AssumeRole",
                "sts:SetSourceIdentity"
            ]
        }
    ]
}
If you do not know the principal needed for the trust policy, open the the Outerbounds Integrations view. Click on the + Add New Integration button and select AWS IAM Role from the dropdown. Then click the Getting your IAM role ARN? dropdown to show the task role's ARN and the tag you will need in the next step.
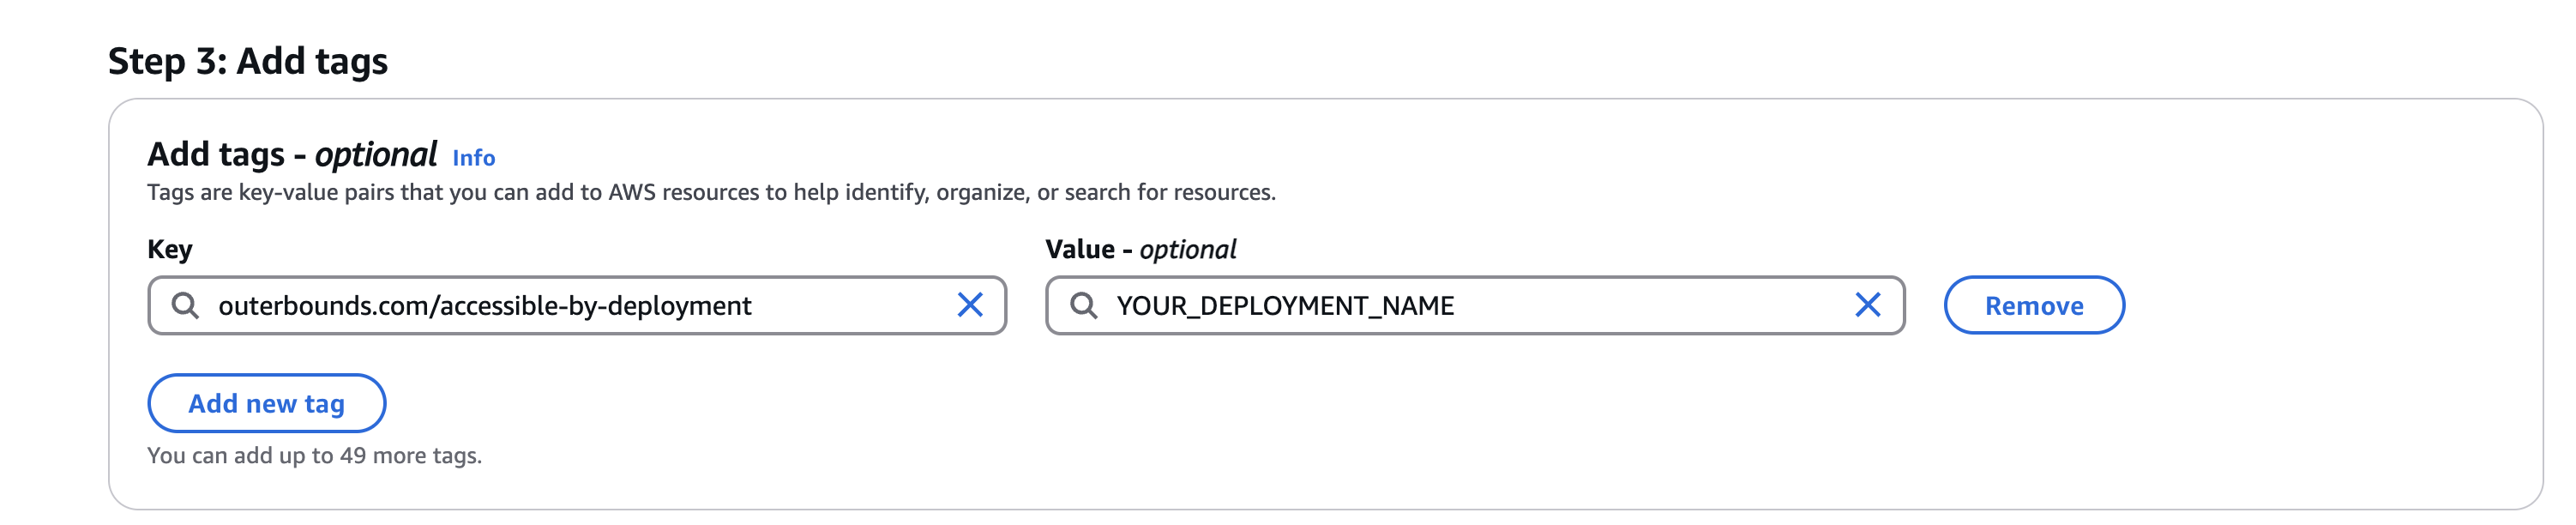
- Tag: The role should have a tag with the key
outerbounds.com/accessible-by-deploymentand the value of your Outerbounds deployment code.
Set up a Sagemaker bucket
Next, we'll create a bucket for Sagemaker to access artifacts like datasets. Technically, you can do this in any bucket, including a pre-existing one. You can leave all default settings, and name the bucket anything you'd like. The default for this tutorial will assume it is called sagemaker-outerbounds-demo (which you will need to change because S3 URIs are globally unique).
After creating the bucket, attach a bucket policy that allows your Sagemaker execution role to operate on the bucket. The policy should look like this:
{
    "Version": "2012-10-17",
    "Statement": [
        {
            "Effect": "Allow",
            "Principal": {
                "AWS": "arn:aws:iam::<AWS_ACCOUNT_ID_SAGEMAKER>:role/<SAGEMAKER_EXECUTION_ROLE>"
            },
            "Action": [
                "s3:PutObject",
                "s3:GetObject"
            ],
            "Resource": "arn:aws:s3:::<S3_SAGEMAKER_BUCKET_NAME>/*"
        },
        {
            "Effect": "Allow",
            "Principal": {
                "AWS": "arn:aws:iam::<AWS_ACCOUNT_ID_SAGEMAKER>:role/<SAGEMAKER_EXECUTION_ROLE>"
            },
            "Action": "s3:ListBucket",
            "Resource": "arn:aws:s3:::<S3_SAGEMAKER_BUCKET_NAME>"
        }
    ]
}
Once your bucket is set up, move on to the next step where you'll download content to your workstation.
Download the content to your workstation
Run the
outerbounds tutorials pull --url https://outerbounds-journeys-content.s3.us-west-2.amazonaws.com/main/journeys.tar.gz --destination-dir ~/learn
command to download the content to your workstation.
The downloaded content may include code packages for several journeys like this; the one we are interested will reside under ~/learn/sagemaker.
If you are not running this example on Outerbounds, you can change the ~/learn directory to a destination of your choice. If you are running on the platform, click next once you see Tutorials pulled successfully.
Assume the role
Open the notebook 00-assume-role-nb from the ~/learn/sagemaker directory. This notebook will guide you through the process of assuming the Sagemaker execution role you created in the previous step.
Training & deployment notebook
Open the notebook 01-train-deploy-nb from the ~/learn/sagemaker directory. This notebook will guide you through the process of training a model and deploying it as an endpoint on Sagemaker.
Training & deployment workflow
Open the 02-train-deploy-flow directory from the ~/learn/sagemaker directory. This directory contains a Metaflow flow that trains a model and deploys it as an endpoint on Sagemaker.
Run the flow with the following command:
python flow.py --environment=fast-bakery run --with kubernetes
Test your endpoint
Open the notebook 03-test-endpoint-nb from the ~/learn/sagemaker directory. This notebook will guide you through the process of testing the Sagemaker endpoint you deployed in the previous step.
Clean up
Open the notebook 04-cleanup-nb from the ~/learn/sagemaker directory. This notebook will guide you through the process of cleaning up the resources you created in this journey.
Next steps
You have completed the primary steps of this journey, showing how you can use Sagemaker features from Outerbounds. There are many, many more ways to integrate Outerbounds with other AWS services!