Example project
Our example project, ob-project-starter, fetches the latest
comic strip from xkcd.com (new ones are published daily), updates a data asset, and triggers a flow to explain the comic using a small visual language model, running locally. In addition, you can browse past comics through a deployed app - and choose to explain any past joke.
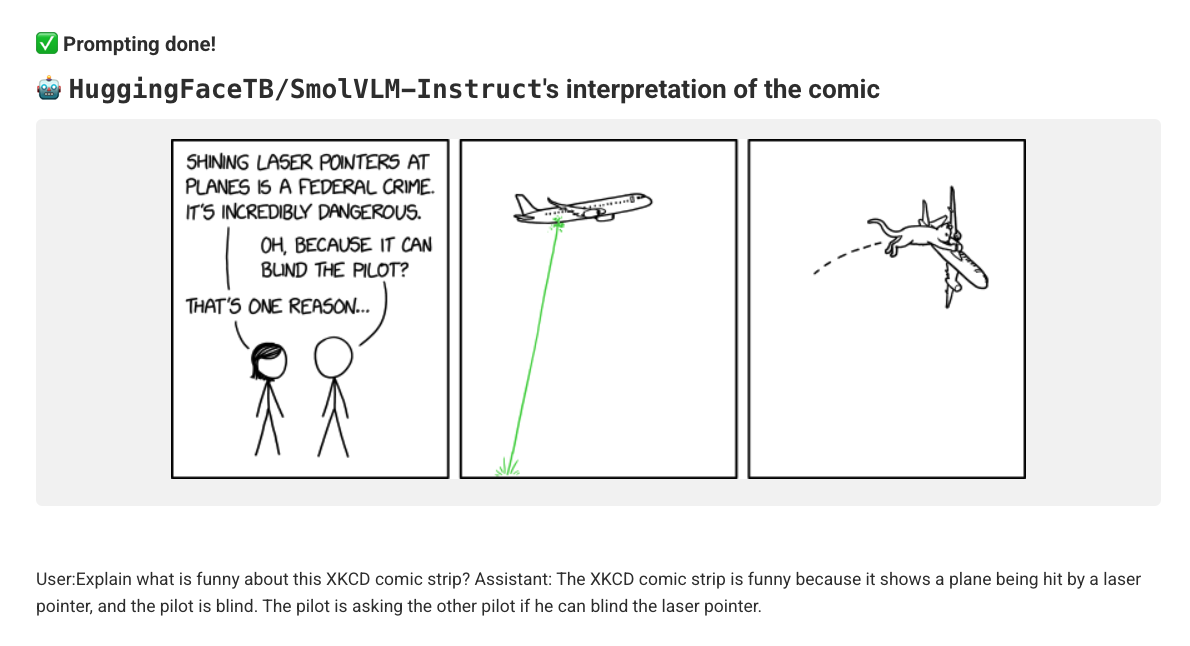
The example is hardly a golden standard when it comes to performant and accurate AI: It is silly to try to explain one comic as a batch process with an undersized model running slowly on a CPU instance - but it offers a good baseline. You can easily improve the example by adding a compute pool with GPUs, running much larger batches of comics through the model (which you can also upgrade easily).
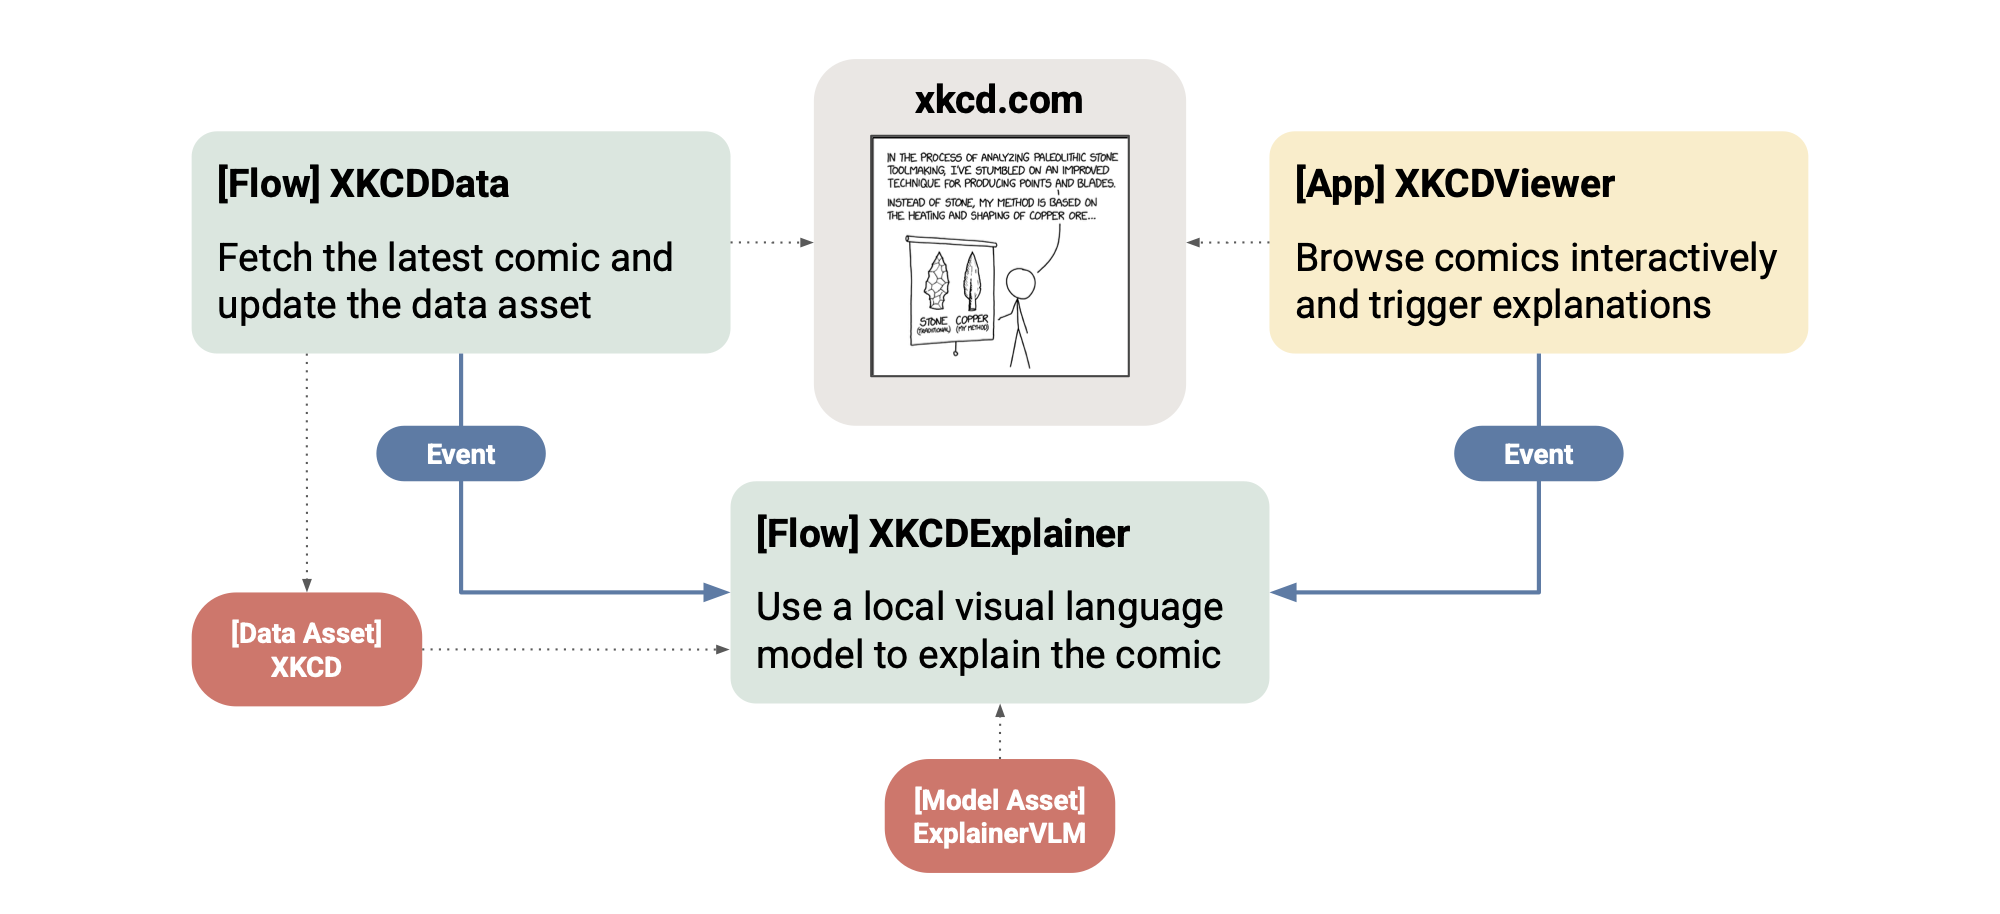
More importantly, the example demonstrates concisely how all the elements of a
project - flows, deployments, code, data, and
models, come together to create a complete, live AI system,
powered by a local model. The project is called ob-project-starter
for a reason: You can use it as an inspiration and as a template for
your own projects.
Deploying the example
Deploy the project as usual:
- Clone the
ob-project-starterrepo - Change
platforminobproject.tomlto match your platform URL. - Create a corresponding CI/CD user.
- Open a pull request and make a commit to trigger a project update.
In success, you should see a project overview page that looks like this - without the highlight cards that need the workflows to run first:

A quick smoke test 💨
Before getting to XKCD, you can quickly test how highlight cards work:
Navigate to Workflows → HighlightTester, click
Actions → Trigger a run, and choose one of these options as a style:
animals
nyan
image
small_square
tall_image
wide_image
revenue
busy
After the run completes, you can see an example highlight card appearing on
the overview page. See the source code of
HighlightTester to see how you can render highlights of
different styles for your own projects.
Any flow can define a @highlight card to make the system readily observable.
The overview page reflects the highlights produced by the latest successful
runs, so you can use them to surface KPIs and health indicators as a
project dashboard. While highlights are concise by design, you can always
surface more information in more detailed @cards, which you can view
easily just by clicking a highlight.
View a comic and trigger an explanation
Next, navigate to Deployments. You should see xkcd-viewer deployed,
which is a simple Streamlit app that allows
you to browse past XKCD comics and trigger an explanation.
Click the link starting with ui- to open the viewer. Browse through
comics and click Trigger analysis to trigger a run of the
XKCDExplainer flow. After you have done it, navigate to
Workflows → XKCDExplainer and observe a run starting. You can follow
the progress of the run through logs and a card.
Click Models to see the model asset used for the explanation. The model is defined in this file, keeping it decoupled from the code and explicitly visible, which is important for evaluation. In real AI projects, teams often iterate across multiple models, making it crucial to track their performance carefully.
Instantiating a local VLM and prompting it takes 3-5 minutes on a small
CPU instance which the example uses by default. If you have configured
a GPU compute pool in Outerbounds, you can speed up prompting drastically
by adding gpu=1 in the @resources of the prompt_vlm step.
Trigger a data asset update
While the first explanation is running, click Data to see data assets
configured for the projects. Initially, the view shows only an empty asset -
the actual xkcd asset is created by XKCDData flow which fetches the
latest comic at midnight daily.
Navigate to Workflows → XKCDData to trigger a data update manually and
observe the Data asset page after there is at least one run of XKCDData.
Note that XKCDData triggers a run of XKCDExplainer automatically whenever
a new comic is found. You can observe explain events facilitating this in
the Events view.
Connecting the dots
Now you have touched all the parts of the system:
The
XKCDDataandXKCDExplainerflows,the
XKCDViewerapp,and
models,data,codeandeventswhich make the system tick.
Also note how the project uses a small shared library, xkcd_utils, encapsulating logic used across flows and deployments.
Developing and testing locally
A key strength of Metaflow is how easily it supports local development and testing, even when flows demand substantial compute resources. Project flows are no different.
For instance, to test XKCDData locally, simply run
python flows/xkcd-data/flow.py run
at the project root. To test the explainer flow that requires more computational resources - including GPUs - try
python flows/xkcd-explainer/flow.py \
  --environment=fast-bakery \
  --with kubernetes \
  run \
  --xkcd_url https://imgs.xkcd.com/comics/every_data_table_2x.png
Note that you can set an environment variable
export METAFLOW_ENVIRONMENT=fast-bakery
to avoid having to set the option repeatedly on the command line.
Note that local testing takes place in the scratch mode, outside Git branches. Use the project switcher to switch to scratch to observe run started locally.
Using assets during development
By default, XKCDExplainer fetches the latest data asset. During local development, you can configure which branch to read assets from while your writes remain isolated to your user namespace.
In obproject.toml, define:
[dev-assets]
branch = 'main'
This lets you consume production assets (from main) while any assets you register go to your Metaflow user branch (e.g., user.alice). This prevents local experiments from contaminating production data.
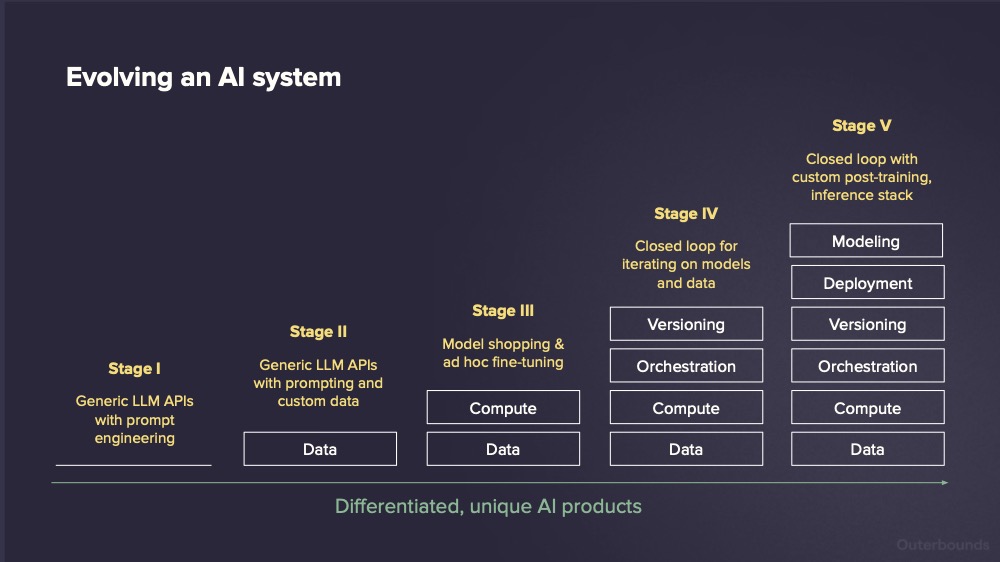
Iterate, evaluate, and deliver standout AI
A key benefit of projects is that they let you iterate quickly and safely on every part of a production-grade system — code, data, and models across both offline and online components.
This enables you to build differentiated AI products rapidly, starting from simple initial versions — like the ob-project-starter example — and incrementally improving the system end to end.
To get a feel how this works in practice, create a new branch for
ob-project-starter, change any aspect of the system, test it locally,
and push a pull request.
You can then observe your branch alongside the existing version, safely running in its own isolated namespace, and compare the results. Notably, you can also invite colleagues to do the same concurrently, without worrying about developers interfering with each other’s work — Stage IV closed-loop development in action!