Project structure
After setting up an empty project, you can begin adding your own components. Fundamentally, all projects are composed of these top-level components:
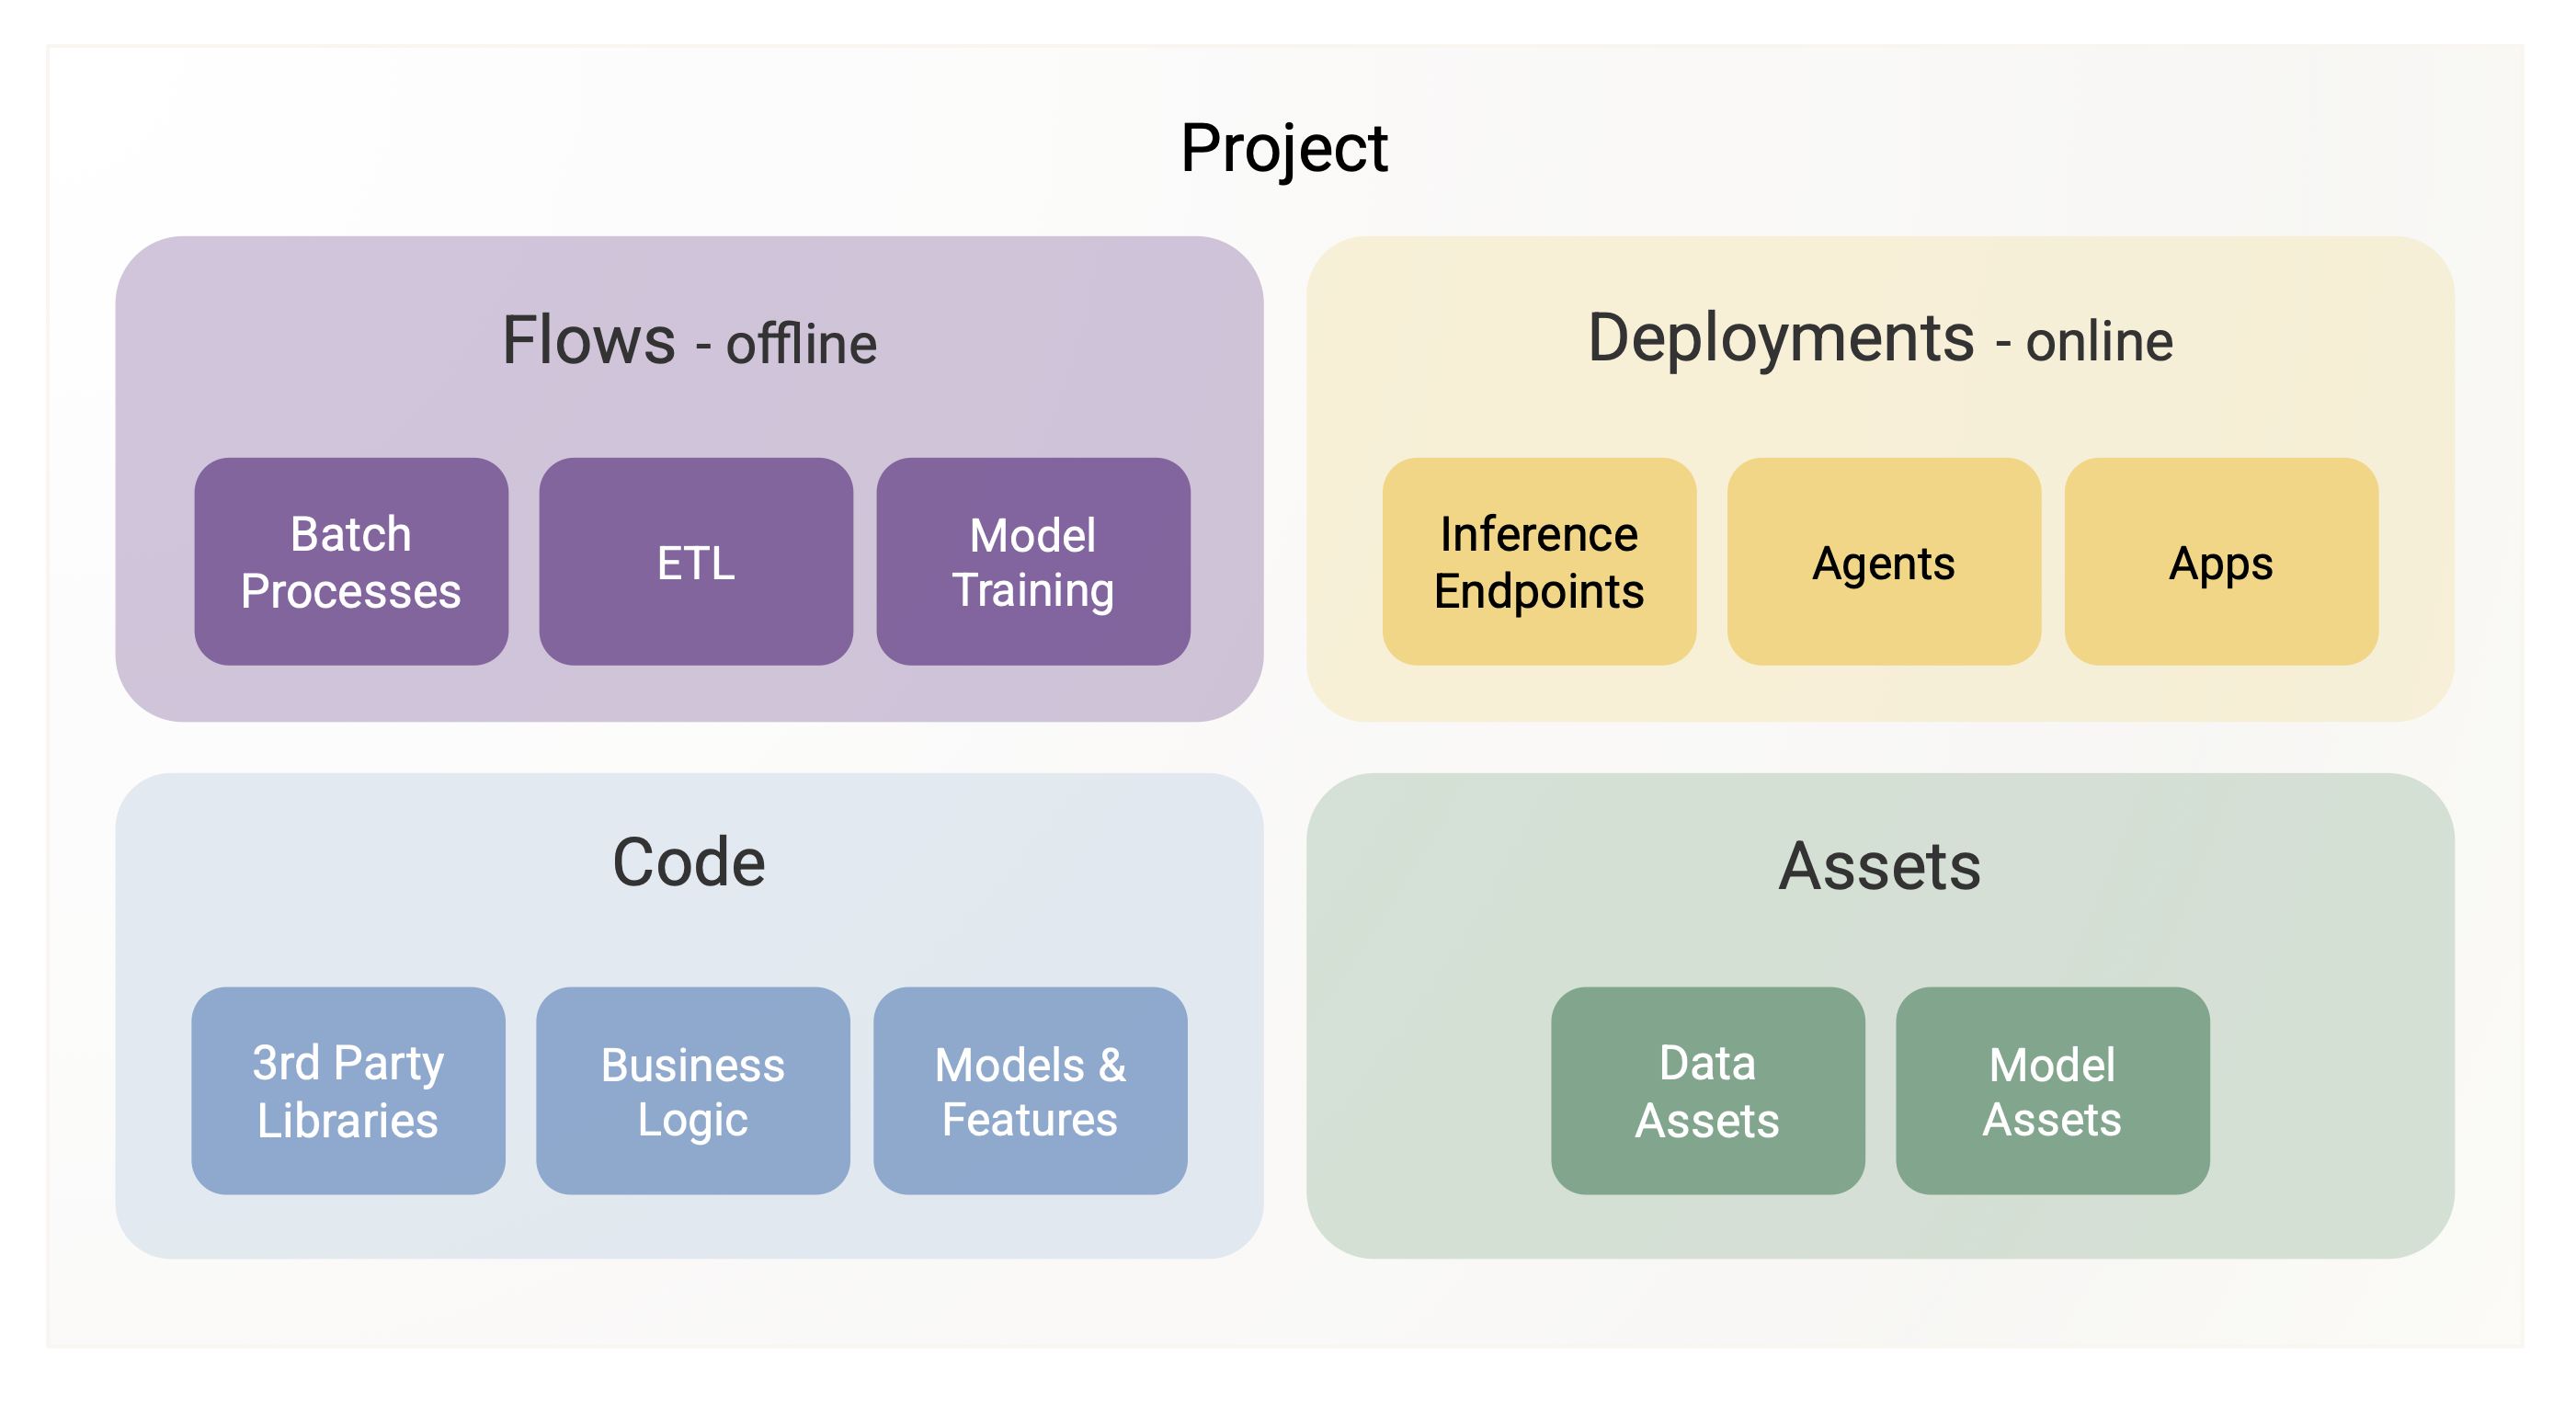
Flows
Flows refer to Metaflow flows, often interconnected through events. They form the backbone of your projects, handling data processing and ETL, model training and finetuning, autonomous / batch inferencing, amongst any other types of background processing and high-performance computing.
In projects, flows are stored under a subdirectory flows, one Metaflow flow
(named flow.py) per subdirectory, alongside any supporting Python modules and packages. As a best practice, it is useful to add a README.md file for each
flow describing its role. They will be surfaced in the UI as well.
Authoring ProjectFlows
Importantly, project flows should subclass from ProjectFlow instead of
Metaflow's standard FlowSpec. In other words, simply author your flows like this:
from obproject import ProjectFlow

class MyFlow(ProjectFlow):
   ...
This leverages Metaflow's BaseFlow
pattern to enrich flows with functionality related to the project structure. Besides this small
detail, you may leverage all Metaflow features in your flows.
A typical flow hierarchy in a project repository ends up looking like this:
flows/

  etl/
    flow.py
    README.md
    feature_transformations.py
    sql/process_data.sql

  train_model/
    flow.py
    README.md
    model.py
Deployments
Deployments are microservices that serve requests through real-time APIs. Use cases include
- Model hosting and inference, including GenAI models running of fleets of GPUs.
- UIs and dashboards, such as Tensorboard, Streamlit apps, or other internal UIs.
- Real-time agents that respond to incoming requests and take action based on LLM outputs.
The platform’s strength comes from the tight connection between flows and deployments, bridging the offline and online worlds. For instance,
- A flow can update a database for RAG continuously, which is then used in real-time by a deployed agent.
- Or, you can have a custom app for monitoring model performance which you use to trigger a model retraining flow.
- It is also possible to deploy model endpoints programmatically from a flow, for instance, whenever a new model has been trained.
In your project, place deployments in the deployments directory. Each
deployment is defined by a configuration file, config.yml, as
documented in the CLI reference. You can define
dependencies for the deployment in a standard requirements.txt or
pyproject.toml. As with flows, it is recommended to add a README.md
for each deployment.
The project hierarchy will look like this
deployments/

  monitoring_dashboard/
    streamlit_app.py
    config.yml
    pyproject.toml
    README.md

  model_endpoint/
    fastapi_server.py
    config.yml
    pyproject.toml
    README.md

  support_agent/
    agent.py
    config.yml
    pyproject.toml
    README.md
Deployment Commands
When obproject-deploy deploys apps, it runs from the project root directory. This means commands in your config.yml must use paths relative to the project root, not the deployment directory.
For example, if your project structure is:
my_project/
  deployments/
    dashboard/
      app.py
      config.yml
    api/
      main.py
      config.yml
  src/
    shared_utils.py
Your config.yml commands should use full paths:
# deployments/dashboard/config.yml
name: dashboard
commands:
  - streamlit run deployments/dashboard/app.py
# deployments/api/config.yml
name: api
commands:
  - gunicorn --workers 2 --bind 0.0.0.0:8000 deployments.api.main:app
This approach has two benefits:
- Shared imports: Apps can import modules from
src/directly (e.g.,from my_module import ...) - Consistency: All paths are relative to the same root, making them predictable
Use file paths for CLI tools (streamlit run deployments/dashboard/app.py) and Python module paths for WSGI/ASGI servers (gunicorn ... deployments.api.main:app).
Code
Effective management of software dependencies is essential for building production-quality projects and enabling rapid iteration and collaboration.
A typical project consists of multiple layers of software dependencies:
- Code definining flows and deployments.
- Project-level shared libraries.
- Organization-level libraries shared across projects.
- Third-party dependencies, such as
pandasandtorch.
As an example, consider the following project that trains a fraud detection model and deploys it for real-time inference:
fraud_detection_model/

  obproject.toml
  pyproject.toml
  README.md

  src/
    feature_encoders/
      __init__.py
      feature_encoder.py

  flows/
    trainer/
      flow.py
      mymodel.py
      README.md

  deployments/
    inference/
      fastapi_server.py
      config.yml
      README.md
Code defining flows and deployments is organized into subdirectories. In addition to the entrypoint file (flow.py) or deployment server, each flow or deployment can include supporting modules and packages, such as mymodel.py.
Project-level shared libraries should be placed under the src directory.
Here, we define a package feature_encoders which is used both during training
and inference to ensure offline-online consistency of features.
src/
  feature_encoders/
    __init__.py
    feature_encoder.py
In each package's __init__.py, include:
METAFLOW_PACKAGE_POLICY = 'include'
This ensures the package gets included in the Metaflow code package when deployed.
Importing shared code
When you run obproject-deploy, it automatically sets up PYTHONPATH so your flows and apps can import modules from src/ directly:
from feature_encoders import MyEncoder # Just use the module name
Both flows and deployments can import shared packages this way.
Organization-level shared libraries can be handled in two ways:
If you can set
METAFLOW_PACKAGE_POLICYin packages, you may simplypip installthem as usual or add them in yourPYTHONPATH. Once youimportthem in your flows and deployments, they'll get packaged automatically. This is a convenient option for private packages, even if they are notpip install-able from a package repository.If the shared libraries are pushed to a package repository - private or public - you can treat them similarly as 3rd party dependencies, described below.
3rd party dependencies can be handled through Metaflow's @pypi or @condadecorators, or through the standard pyproject.toml or requirements.txt files. When the project is deployed, Outerbounds uses Fast Bakery to bake the requirements into a container image automatically.
For convenience, you may drop a project-wide pyproject.toml at the root of
the project next to obproject.toml. For instance, to include pandas and
fastapi in the project, you can specify a pyproject.toml as follows:
[project]
dependencies = [
    "pandas==2.2.2",
    "fastapi==0.116.1"
]
This file will be used universally in all flows (
through @pypi_base)
and deployments without you having to specify anything else manually.
This is handy if you want to ensure that all
components of the project use the exact same set of dependencies.
Assets
What sets ML/AI projects apart from traditional software engineering is that they rely not only on code, but also on data and models.
A key difference between code and data/models is that in real-world systems, data and models are often updated continuously and automatically - new data streams in, and models are retrained constantly, whereas updating code is a much more manual process (even when the code is authored with AI co-pilots).
Metaflow artifacts are a core building block for managing data and models. Outerbounds Projects extends this concept with data assets and model assets, which complement artifacts by adding an extra layer of metadata and tracking.
Think of assets as a superset of artifacts: they let you elevate select data and models to a special status, making them easy to track in the UI. In practice, this gives you a model registry and data lineage tracking, seamlessly integrated with your projects. Read more about assets on a dedicated page.
By default, obproject-deploy looks for model assets in models/ and data assets in data/. If these folder names conflict with existing directories in your project (e.g., models/ used for data model schemas), you can customize them in obproject.toml:
[obproject_dirs]
models = "ml_models"   # Look for model assets here instead of models/
data = "datasets"      # Look for data assets here instead of data/
Local Development
ProjectFlow automatically applies @pypi_base when your project has a pyproject.toml with dependencies. This ensures reproducible environments for both local and remote runs, but requires specifying an environment.
Running Flows Locally
When @pypi_base is applied, you need to specify an environment:
python flows/train/flow.py --environment=fast-bakery run
Skipping Dependency Isolation
In some contexts, you may wish to continue subclassing an obproject.ProjectFlow but turn off this automatic application of @pypi_base.
For such local iteration using your existing Python environment, you can skip the @pypi_base decorator:
Option 1: Environment variable (per-run)
OBPROJECT_SKIP_PYPI_BASE=1 python flows/train/flow.py run
Option 2: Shell profile (persistent)
# Add to ~/.bashrc or ~/.zshrc
export OBPROJECT_SKIP_PYPI_BASE=1
Option 3: Config file (per-project)
# obproject.toml
[dependencies]
include_pyproject_toml = false
Althought this can be convenient when iterating locally, for production deployments via CI/CD it is a recommended best practice for dependencies are always applied with --environment=fast-bakery, ensuring reproducible builds regardless of your local settings.
CI/CD Integration
Projects integrate seamlessly with CI/CD platforms to enable continuous deployment. The obproject-deploy CLI utility available via pip install obproject-utils automates deployment of flows and applications, making it straightforward to set up GitOps workflows.
GitHub Actions
GitHub Actions can deploy your project automatically when code is pushed to specific branches. Create .github/workflows/deploy.yml:
name: Deploy to Outerbounds

on:
  push:
    branches:
    - main
    - develop
    - 'feature/**'

env:
  GH_HEAD_REF: ${{ github.head_ref }}
  GH_REF: ${{ github.ref_name }}

permissions:
  id-token: write
  contents: read
  pull-requests: write

jobs:
  deploy:
    name: Deploy Project
    runs-on: ubuntu-latest

    steps:
    - uses: actions/checkout@v4
      with:
        ref: ${{ github.event.pull_request.head.sha }}
        fetch-depth: 0

    - name: Set up Python
      uses: actions/setup-python@v1
      with:
        python-version: 3.12

    - name: Install dependencies
      run: |
        python3 -m pip install -U requests
        python3 -m pip install outerbounds pyyaml
        python3 -m pip install -U ob-project-utils
    - name: Configure Outerbounds
      run: |
        PROJECT_NAME=$(yq .project obproject.toml)
        DEFAULT_CICD_USER="${PROJECT_NAME//_/-}-cicd"
        PLATFORM=$(yq .platform obproject.toml)
        CICD_USER=$(yq ".cicd_user // \"$DEFAULT_CICD_USER\"")
        PERIMETER="default"
        echo "🏗️ Deployment target:"
        echo "  Platform: $PLATFORM"
        echo "  CI/CD User: $CICD_USER"
        echo "  Perimeter: $PERIMETER"
        outerbounds service-principal-configure \
          --name $CICD_USER \
          --deployment-domain $PLATFORM \
          --perimeter $PERIMETER \
          --github-actions

    - name: Deploy Project
      env:
        COMMIT_URL: "https://github.com/${{ github.repository }}/commit/"
        CI_URL: "https://github.com/${{ github.repository }}/actions/runs/${{ github.run_id }}"
        GH_TOKEN: ${{ secrets.GITHUB_TOKEN }}
        COMMENTS_URL: ${{ github.event.pull_request.comments_url }}
        PYTHONUNBUFFERED: 1
      run: obproject-deploy
This workflow:
- Triggers on pushes to main, develop, and feature branches
- Authenticates using a machine user
- Deploys flows, apps, and assets as configured
Use per-component obproject_deploy.toml files to control which branches deploy each app or flow. See Project lifecycle for details.
If you do not use obproject-deploy, you'll need to determine when to invoke outerbounds service-principal-configure ... in CI runs.
Azure DevOps
Azure DevOps Pipelines support Outerbounds projects with automatic branch detection and JWT-based authentication. Create azure-pipelines.yml:
trigger:
  branches:
    include:
    - main
    - develop
    - feature/*

pool:
  vmImage: ubuntu-latest

steps:
- checkout: self

- task: AzureCLI@2
  displayName: 'Configure Outerbounds'
  inputs:
    azureSubscription: 'dev-ob'  # Replace with your Azure service connection name
    addSpnToEnvironment: true
    scriptType: bash
    scriptLocation: inlineScript
    inlineScript: |
      # Check if yq is available
      which yq || (echo "yq not found, installing..." && wget -qO /usr/local/bin/yq https://github.com/mikefarah/yq/releases/latest/download/yq_linux_amd64 && chmod +x /usr/local/bin/yq)

      PROJECT_NAME=$(yq .project obproject.toml)
      DEFAULT_CICD_USER="${PROJECT_NAME//_/-}-cicd"
      PLATFORM=$(yq .platform obproject.toml)
      CICD_USER=$(yq ".cicd_user // \"$DEFAULT_CICD_USER\"" obproject.toml)
      PERIMETER="default"
      echo "🏗️ Deployment target:"
      echo "  Platform: $PLATFORM"
      echo "  CI/CD User: $CICD_USER"
      echo "  Perimeter: $PERIMETER"
      python -m pip install -U pyyaml requests toml 'outerbounds[azure]' ob-project-utils
      outerbounds service-principal-configure \
        --name $CICD_USER \
        --deployment-domain $PLATFORM \
        --perimeter $PERIMETER \
        --jwt-token $idToken

- script: |
    # Debug environment detection
    echo "=== Debugging CI Environment ==="
    echo "BUILD_SOURCEBRANCH: $(Build.SourceBranch)"
    echo "SYSTEM_COLLECTIONURI: $(System.CollectionUri)"
    echo "Git branch from rev-parse: $(git rev-parse --abbrev-ref HEAD)"
    echo "Git status:"
    git status
    echo "=== Running deploy ==="

    obproject-deploy

  displayName: 'Deploy Project'
  env:
    # https://learn.microsoft.com/en-us/azure/devops/pipelines/process/variables?view=azure-devops
    SYSTEM_ACCESSTOKEN: $(System.AccessToken)
    PYTHONUNBUFFERED: 1
    # Pass all Azure DevOps variables that the deploy script needs
    BUILD_SOURCEBRANCH: $(Build.SourceBranch)
    SYSTEM_PULLREQUEST_SOURCEBRANCH: $(System.PullRequest.SourceBranch)
    SYSTEM_COLLECTIONURI: $(System.CollectionUri)
    SYSTEM_TEAMPROJECT: $(System.TeamProject)
    BUILD_REPOSITORY_NAME: $(Build.Repository.Name)
    BUILD_REPOSITORY_ID: $(Build.Repository.ID)
    BUILD_BUILDID: $(Build.BuildId)
    SYSTEM_PULLREQUEST_PULLREQUESTID: $(System.PullRequest.PullRequestId)
The pipeline automatically detects the current branch through Azure's built-in environment variables (BUILD_SOURCEBRANCH, SYSTEM_PULLREQUEST_SOURCEBRANCH).
CircleCI
CircleCI supports Outerbounds projects using OIDC tokens for secure authentication. Create .circleci/config.yml:
version: 2.1

jobs:
  deploy:
    docker:
      - image: cimg/python:3.12
    steps:
      - checkout

      - run:
          name: Install dependencies
          command: |
            python -m pip install -U pip
            python -m pip install -U outerbounds ob-project-utils requests pyyaml

      - run:
          name: Configure Outerbounds
          command: |
            # Read config using Python (more portable than yq)
            if [ -f "obproject_multi.toml" ]; then
              echo "Multi-project repository detected"
              CICD_USER=$(python -c "import tomllib; print(tomllib.load(open('obproject_multi.toml', 'rb'))['cicd']['user'])")
              PLATFORM=$(python -c "import tomllib; print(tomllib.load(open('obproject_multi.toml', 'rb'))['cicd']['platform'])")
              PERIMETER=$(python -c "import tomllib; print(tomllib.load(open('obproject_multi.toml', 'rb'))['cicd'].get('perimeter', 'default'))")
            else
              echo "Single-project repository detected"
              PROJECT_NAME=$(python -c "import tomllib; print(tomllib.load(open('obproject.toml', 'rb'))['project'])")
              PLATFORM=$(python -c "import tomllib; print(tomllib.load(open('obproject.toml', 'rb'))['platform'])")
              CICD_USER="${PROJECT_NAME}-cicd"
              PERIMETER="default"
            fi

            outerbounds service-principal-configure \
              --name $CICD_USER \
              --deployment-domain $PLATFORM \
              --perimeter $PERIMETER \
              --jwt-token $CIRCLE_OIDC_TOKEN_V2

      - run:
          name: Deploy Project
          command: obproject-deploy
          environment:
            PYTHONUNBUFFERED: "1"

      - store_artifacts:
          path: deployment_summary.md
          destination: deployment-summary

workflows:
  deploy:
    jobs:
      - deploy:
          # A context is REQUIRED for $CIRCLE_OIDC_TOKEN_V2 to be available.
          # The context can be empty - it just needs to exist and be referenced.
          context: outerbounds
          filters:
            branches:
              only:
                - main
CircleCI setup requirements:
- Create a machine user in the Outerbounds UI with type "CircleCI"
- Create a CircleCI context (can be empty) - OIDC tokens are only available to jobs that reference a context
- Reference the context in your workflow configuration
The deploy script automatically detects CircleCI through the CIRCLECI environment variable and extracts branch information from CIRCLE_BRANCH.
GitLab CI/CD
GitLab CI/CD supports OIDC authentication via the id_tokens keyword. Create .gitlab-ci.yml:
stages:
  - deploy

deploy:
  stage: deploy
  image: python:3.12
  rules:
    - if: $CI_PIPELINE_SOURCE == "merge_request_event"
    - if: $CI_COMMIT_BRANCH == "main"

  # IMPORTANT: The 'aud' value must match your Outerbounds platform URL.
  # This cannot be dynamically read from obproject.toml because GitLab
  # evaluates id_tokens at pipeline creation time, before any scripts run.
  id_tokens:
    OUTERBOUNDS_ID_TOKEN:
      aud: https://my-company.outerbounds.com  # Update to your platform URL

  script:
    - wget -qO /usr/local/bin/yq https://github.com/mikefarah/yq/releases/latest/download/yq_linux_amd64 && chmod +x /usr/local/bin/yq
    - PROJECT_NAME=$(yq .project obproject.toml)
    - PLATFORM=$(yq .platform obproject.toml)
    - CICD_USER="${PROJECT_NAME//_/-}-cicd"
    - PERIMETER="default"

    - python -m pip install -U outerbounds ob-project-utils pyyaml

    - |
      outerbounds service-principal-configure \
        --name $CICD_USER \
        --deployment-domain $PLATFORM \
        --perimeter $PERIMETER \
        --jwt-token $OUTERBOUNDS_ID_TOKEN

    - obproject-deploy
GitLab setup requirements:
- Create a machine user in the Outerbounds UI with type "GitLab"
- Update the
audvalue to match your Outerbounds platform URL (e.g.,https://my-company.outerbounds.com)
The deploy script automatically detects GitLab CI through the GITLAB_CI environment variable and extracts branch information from CI_COMMIT_REF_NAME.
See the CI/CD integration guide for authentication setup and additional platforms.
Multi-Project Repositories
For monorepo setups with multiple independent projects, use obproject_multi.toml at the repository root:
[cicd]
user = "<project-name>-cicd"          # TODO: your machine user, conventionally <project-name>-cicd.
platform = "platform.outerbounds.xyz" # TODO: your Outerbounds deployment url.

[projects]
fraud_detection = "ml/fraud-detection" # project_name = "path/to/project/root"
recommendation = "ml/recommendation"
data_ingestion = "pipelines/ingestion"
Each project directory contains its own obproject.toml and standard project structure. When you run obproject-deploy from the repository root, it:
- Detects
obproject_multi.toml - Authenticates as the specified machine user
- Deploys each project independently to the configured platform
Individual projects can still be deployed independently by running obproject-deploy from their directories, which will use that project's specific obproject.toml configuration.
Repository structure example:
company-ml-platform/
  obproject_multi.toml

  ml/
    fraud-detection/
      obproject.toml
      src/                  # Project-specific shared code
        models.py
        feature_encoders.py
      flows/...
      deployments/...

    recommendation/
      obproject.toml
      src/                  # Each project has its own src/
        recommenders.py
      flows/...
      deployments/...

  pipelines/
    ingestion/
      obproject.toml
      flows/...
Each sub-project can have its own src/ directory for shared code. Imports like from models import MyModel work because obproject-deploy sets up PYTHONPATH to include src/ for both flows and deployments.
See ob-multi-project-empty for a complete example.
Branch Configurations
You can map code branches to different Perimeters and Deployments configuration files to automate environment isolation. This is configured in obproject.toml:
platform = 'platform.outerbounds.xyz'
project = 'fraud_detection'

# Map branches to environments (supports glob patterns)
[branch_to_environment]
"main" = "production"
"develop" = "staging"
"feature/*" = "dev"
"*" = "dev"  # Catch-all default

# Production environment (main branch)
[environments.production]
perimeter = "prod-perimeter"
deployment_config = "deployments/api/config.prod.yml"

# Staging environment (develop branch)
[environments.staging]
perimeter = "staging-perimeter"
deployment_config = "deployments/api/config.staging.yml"

# Development environment (feature/* and other branches)
[environments.dev]
perimeter = "default"
deployment_config = "deployments/api/config.yml"
When you run obproject-deploy, it:
- Detects the current git branch
- Maps it to an environment using glob pattern matching (first match wins)
- Switches to the environment's perimeter
- Uses the environment's deployment config for applications
This enables workflows like:
# Automatically deploy to production perimeter with prod config
git checkout main
obproject-deploy

# Automatically deploy to staging perimeter with staging config
git checkout develop
obproject-deploy

# Automatically deploy to dev perimeter with dev config
git checkout feature/new-model
obproject-deploy
Environment-specific configurations can vary resources, replicas, and settings:
# config.prod.yml - Production configuration
name: fraud-api-prod
environment:
  ENV_NAME: "production"
  LOG_LEVEL: "warning"
resources:
  cpu: "4"
  memory: "8Gi"
commands:
  - "gunicorn --workers 8 --worker-class uvicorn.workers.UvicornWorker --bind 0.0.0.0:8000 app:app"
# config.yml - Development configuration
name: fraud-api-dev
environment:
  ENV_NAME: "development"
  LOG_LEVEL: "debug"
resources:
  cpu: "0.5"
  memory: "512Mi"
commands:
  - "gunicorn --workers 1 --worker-class uvicorn.workers.UvicornWorker --bind 0.0.0.0:8000 app:app"
Pattern matching precedence: Branch patterns are matched in the order they appear in [branch_to_environment]. Place specific patterns before wildcards to ensure correct matching.
Flow Configs
Flows often use Metaflow's Config to load JSON configuration files. There are two patterns for organizing configs:
Pattern 1: Flow-local configs (simpler)
Place config files directly in the flow directory:
flows/
  train/
    flow.py
    config.json    # Co-located with flow
class TrainFlow(ProjectFlow):
    config = Config("config", default="config.json")  # Relative to flow dir
This works out of the box - no additional configuration needed.
Pattern 2: Shared configs at project root
For configs shared across multiple flows, place them at the project root and register them in obproject.toml:
my_project/
  configs/
    model.json
    training.json
  flows/
    train/flow.py
    evaluate/flow.py
[environments.production.flow_configs]
model_config = "configs/model.json"
training_config = "configs/training.json"

[environments.dev.flow_configs]
model_config = "configs/model.json"
training_config = "configs/training.json"
class TrainFlow(ProjectFlow):
    model_config = Config("model_config", default="configs/model.json")
    training_config = Config("training_config", default="configs/training.json")
How it works: The deploy script detects Config() declarations in each flow and passes corresponding paths from flow_configs. This ensures project-root paths resolve correctly when deploying from flow subdirectories.
Only register configs in flow_configs when using project-root paths (like configs/model.json). Flow-local configs (like config.json in the same directory as flow.py) don't need registration.
See ob-project-branch-config for a complete example with multi-environment deployment and API clients.
Next, let's take a look at an example project that gets back to the basics, and shows how these buildings blocks fit together in a real-world project.